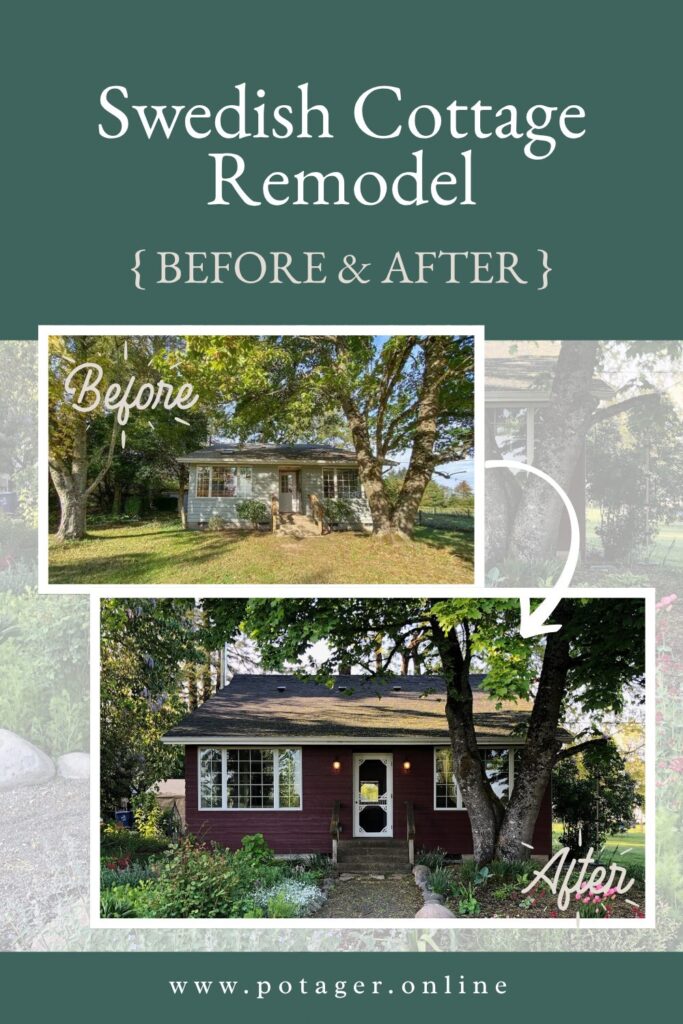
It’s finally time you guys. Time to do a REAL, legit BEFORE & AFTER post for this Swedish Cottage of ours. We have spent five years pouring every spare moment and every dollar (and then some) into this homestead, and I want to really mark the occasion and reflect on how far we’ve come. You see, it was 5 years ago this week that we stumbled upon this place we lovingly call Bramblewood.
And here’s how it happened.
It was around 9 o’ clock in the morning. I got a text from my husband. Oddly enough, he was still in the house. It was a cold, foggy Fall morning and he was taking his time getting ready to head to work. In fact, he was parked in one of his favorite places- I’ll let you guess where- and apparently scrolling the real estate listings.
“Check this place out,” his text said.
A little background history
To give you a little context, I LOVED the home we were living in at the time. The Cottage on the Corner we called it. We had done a two-month extreme makeover when we first bought, basically making it a brand new house. It was small but open, perfect for our two little boys, currently in baby and toddler stages. It had a small, sweet kitchen, a great little garden, sat on one acre just kitty corner to the family farm, and still had plenty of projects to complete. I had no intention of moving.
And yet…we had spent years talking about having our own homestead. A property where we could raise our own meat, have room for an income crop, have space for our kids to run wild and play in a safe and quiet place.
The place we were living was on a very busy corner, a very noisy, busy corner, completely exposed to the hundreds of cars that drove by every day. There was no room to grow or expand to accommodate our dreams, and though I knew it probably wasn’t a long term situation, I was comfortable! I was content. It was easy.
So when I got that text from my husband at 9 a.m. from inside the bathroom, I didn’t think much of it. I looked at the listing, thought it was a nice property that needed a lot of work, but didn’t take it too seriously.
When I got a call from him just an hour and a half later though, he told me he’d driven by the place, called our realtor and scheduled a viewing for 11:30 a.m. Like, IN AN HOUR. What in the world!? My husband is not exactly known for impulse decisions. This was so our of character! My stomach began to fill with butterflies.

Love at first sight
The new property was a short drive away- about 5 miles North of the family farm. I’ll never forget pulling onto a gravel road I’d never driven on before, wondering what in the world my husband was thinking. I pulled into the long, tree-lined driveway, drove all the way through to the end, and parked at the edge of an old, overgrown fruit orchard. My husband pulled in right after me, and as we unloaded the boys, I took a deep breath. Our oldest ran straight into the orchard, immediately laughing and giggling as he ran through the tall grass. He picked up a juicy, red apple fallen from one of the trees and took a massive bite. With our youngest on my hip, I followed my husband through the old, gnarled fruit trees, my heart beating fast and a lump starting to form in my throat.
When we reached the edge of the orchard and began to head for the house, I grabbed the sleeve of his shirt and in a choked whisper said, “If this isn’t the place for us, I don’t want to go any further.”
“I think it is the place,” he responded with a lopsided grin. He took my hand, gave it a squeeze and led me towards what would soon become our little Swedish Cottage.

Over the years
Before we go room by room and dive into the BEFORE & AFTERS of our Swedish Cottage, I want to give you a bit of a disclaimer. After five years, a lot of progress and the completion of some of the really massive (and at times painful) projects, it is MUCH easier to romanticize the journey than it was along the way.
Over the last five years I have cried many tears of fear, anger, regret, discontent, impatience and plenty of other unflattering nouns and verbs. I have run the emotional gamut of everything from “I never want to leave this place ever,” to “how can we get out of here as quickly as possible!?” I have worked myself into new levels of exhaustion and experienced new lows of discouragement. IT HAS BEEN SO HARD. It has been SO unbelievably hard! Harder than I ever could have imagined.
And yet, I am so incredibly grateful for this place. We have learned so much, grown so much, matured so much. I have had the opportunity to look at things in my heart that I might never have had to face otherwise. I have learned to hold onto things a little more loosely. Just as becoming a mother is an incredibly sanctifying experience, so too has been the ownership of this homestead. I am so thankful the Lord provided this perfectly imperfect place for our to raise our family, work without our hands and pursue the quiet life we so vehemently believe in.
Now…the BEFORE & AFTERS!
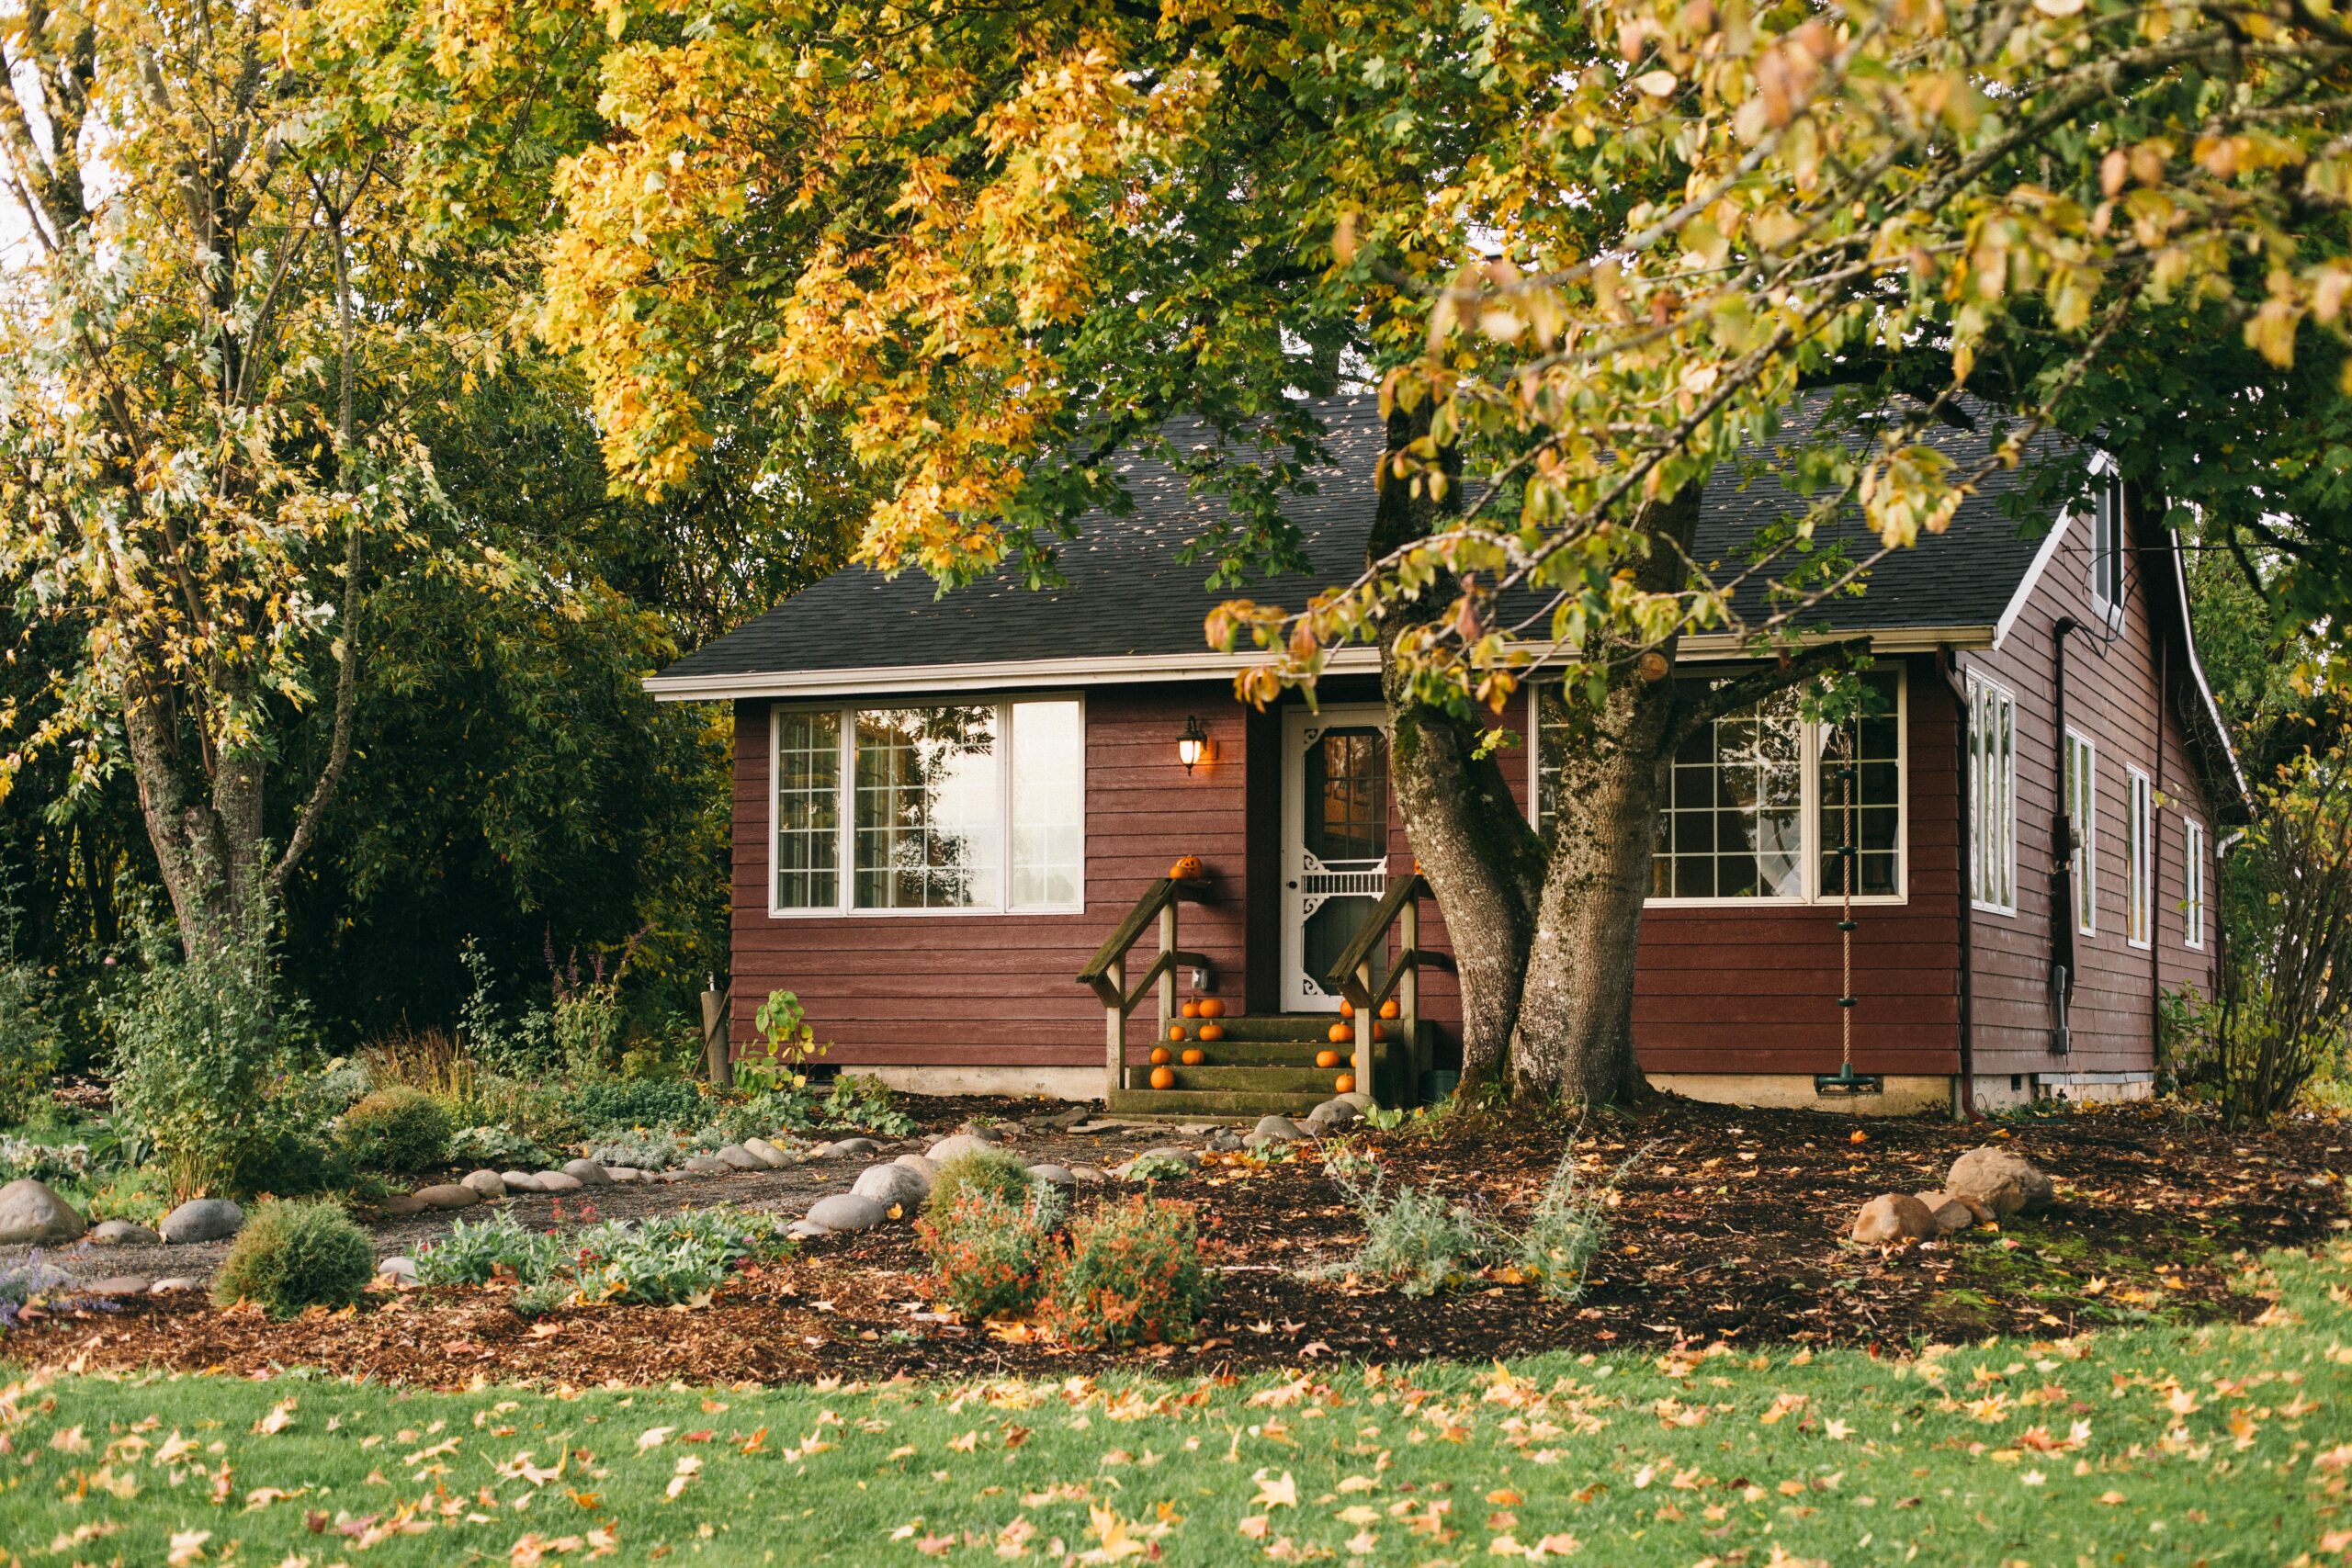
Alright, enough of my sermonizing, let’s see some BEFORE & AFTERS!!!!!!!!!!!! Or at least BEFORE we bought the place and AFTER 5 years. You can read more about our vision of turning this place into the Oregon version of a Swedish Cottage here. It’s been SO much time and effort, plenty of mistakes and more money than we ever could have dreamed, but our home finally feels “finished.” Or at least finished enough, and for that I am so grateful. Especially in this busy soccer mom stage of life.
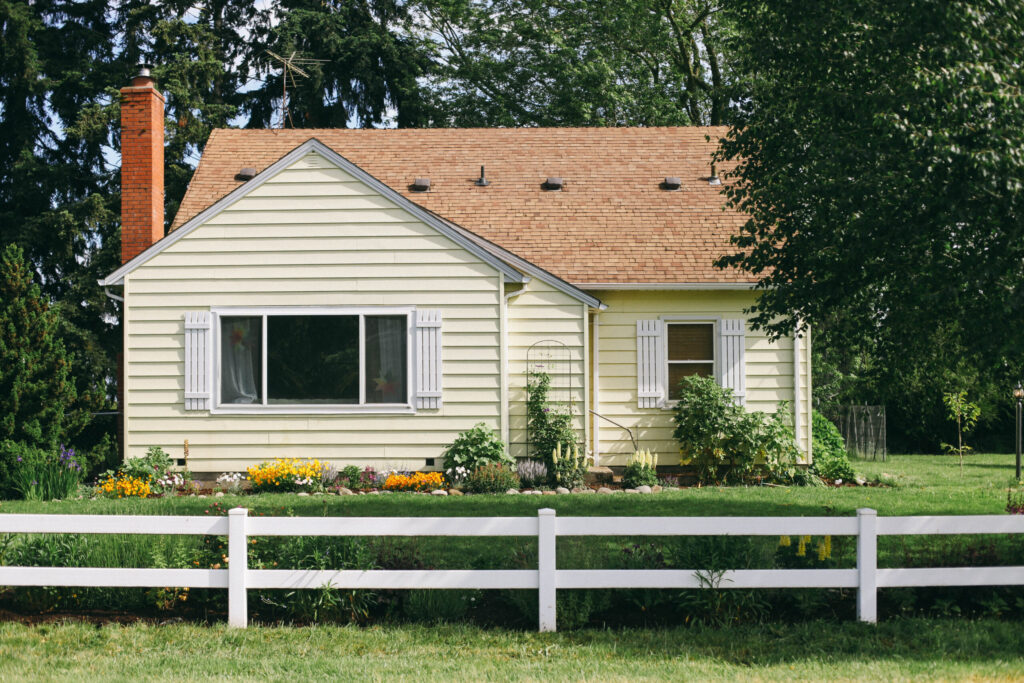
Here’s my photo disclaimer: I don’t have a nice, wide-angle lens for my good camera, so most of the BEFORE & AFTER photos are with my phone. Sorry, but that’s how it goes. I have included some detail shots taken with my nice camera, which are more true to the actual light in our home. The BEFORE photos are all from the real estate listing when we bought, and I attempted to get the same angle/shot with my phone. Kinda fun! Let’s dive in, shall we?
Swedish Cottage Entry
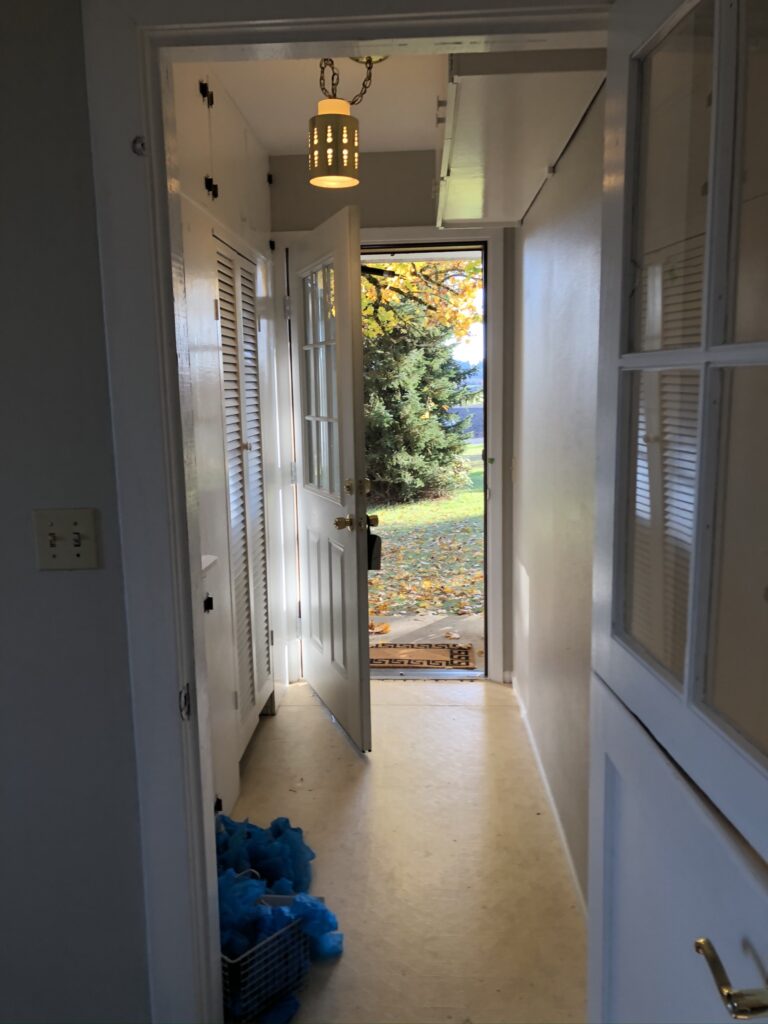
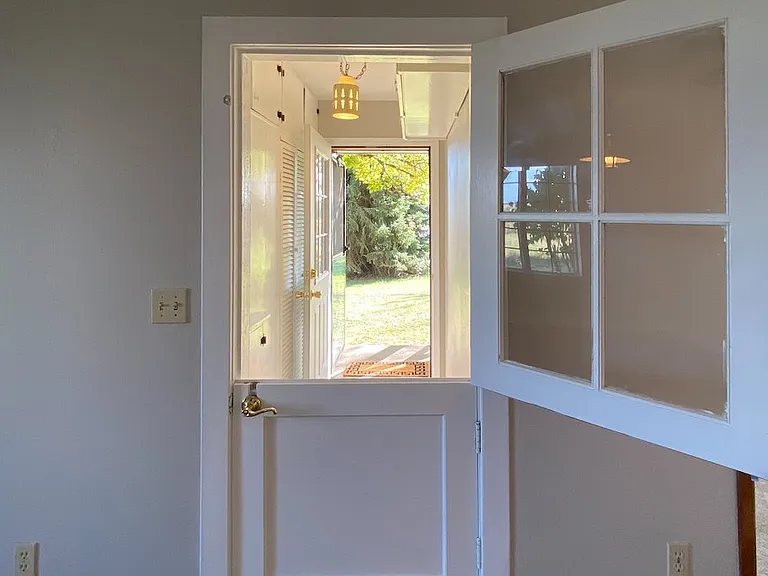
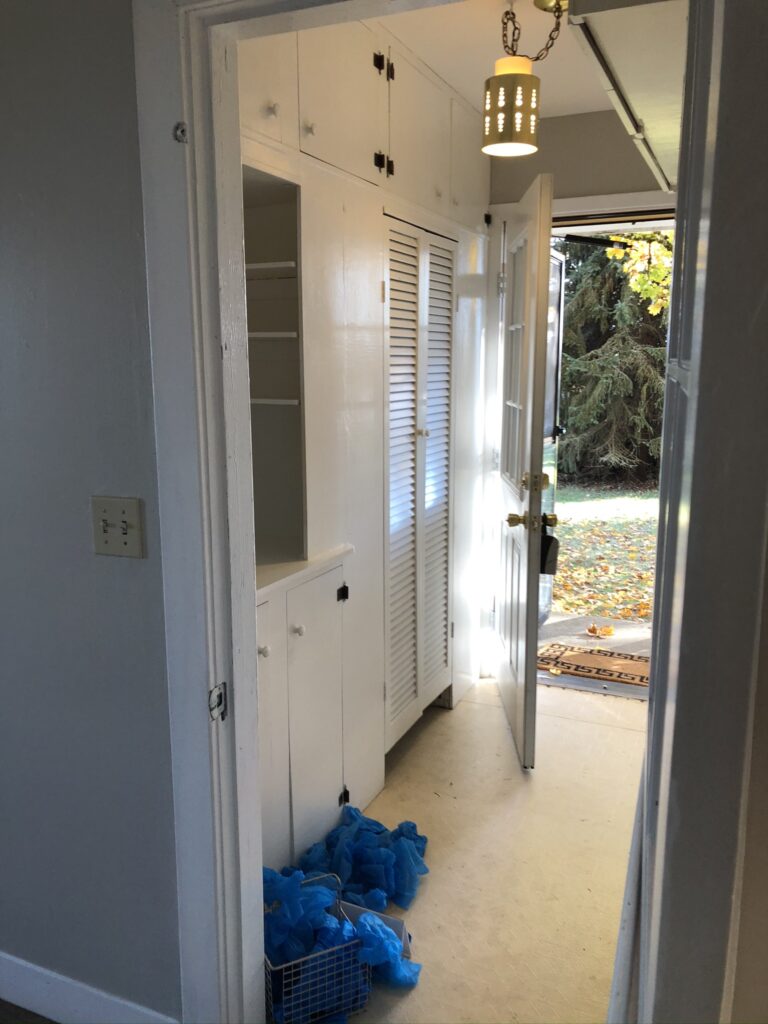
BEFORE
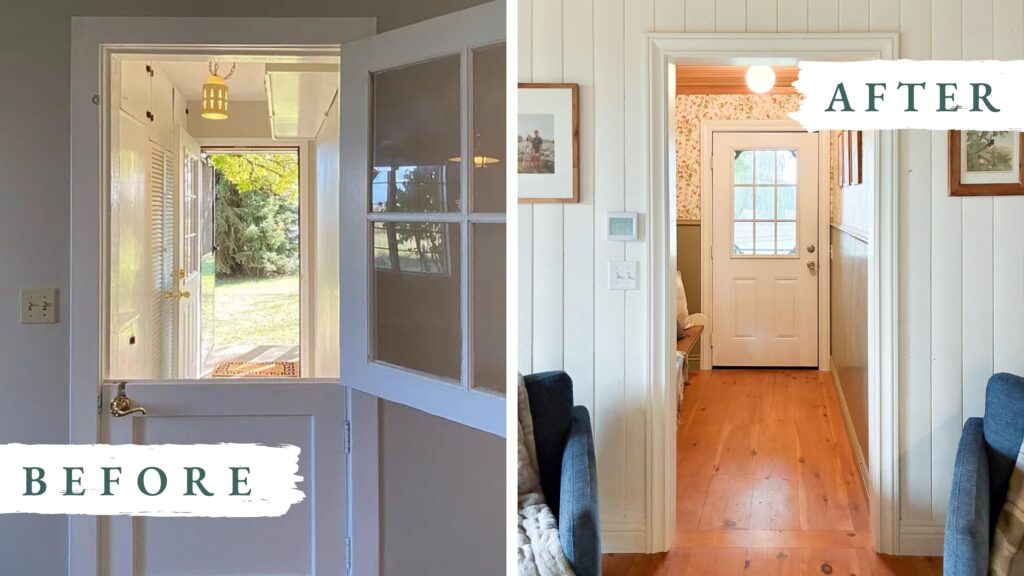
When we bought the house, the front entry was a small room, jam-packed with plywood cabinetry, a cheap IKEA light fixture and linoleum floors. It also had a DIY Dutch Door leading into the living room. It made walking into the house feel tight, stuffy and unwelcoming. I immediately knew I’d want to rip everything out and open it up to the living space.
AFTER
So we did just that! We tore out all the plywood cabinetry, removed the $10 light and covered the floors with the wide-plank pine that flowed through the rest of the downstairs. We removed the Dutch Door, and though I’d originally hoped to expand the opening, we realized there was quite a bit of electrical in that short wall, so we left it and just made it a cased opening.
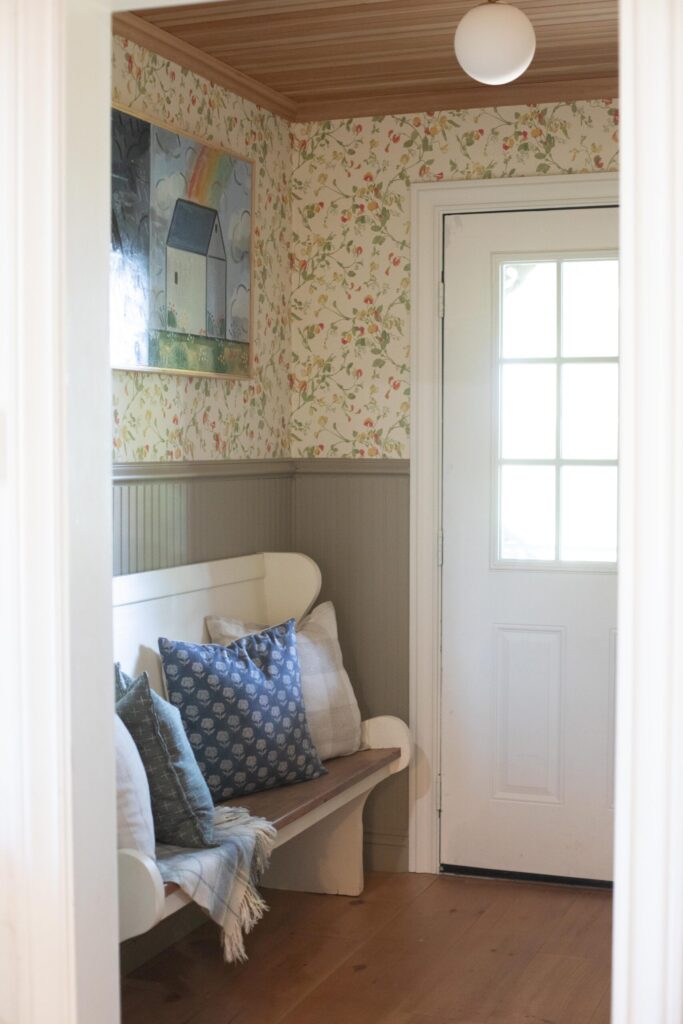
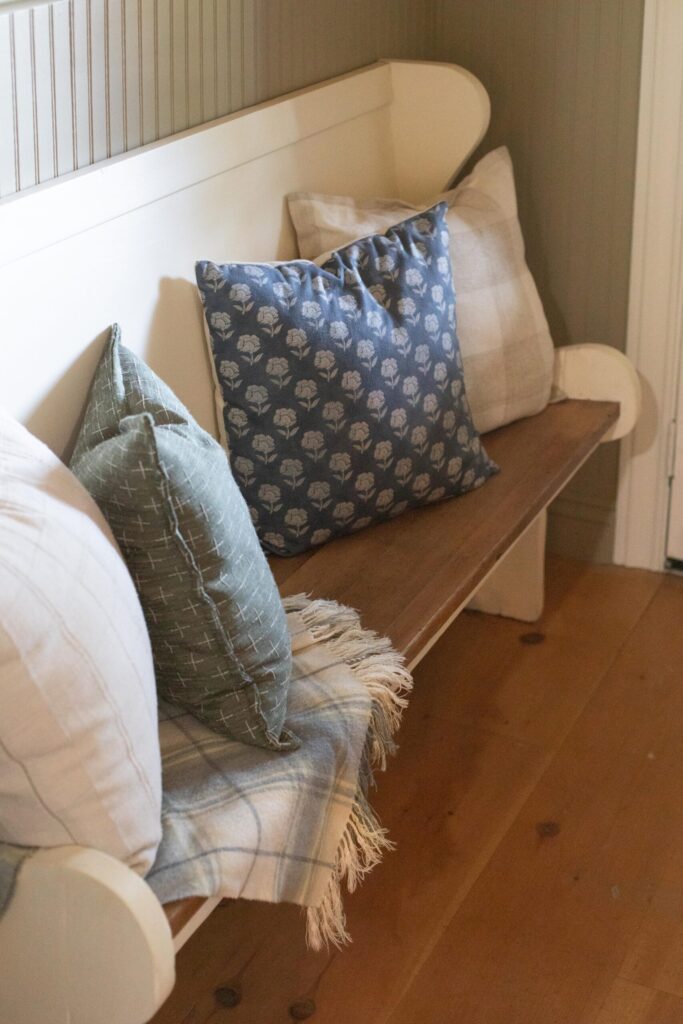
We added Cole & Sons Sweet Pea Wallpaper and a 4ft beadboard wood wainscot, which we (eventually- after some color changes) painted Benjamin Moore’s Providence Olive. I restored the old church pew that sat at Taylor’s grandpa’s breakfast table with some stain and chalk paint, and added a beautiful globe light fixture. The crowning glory of this space is the painting gifted to me by my dear friends Kymberli and Richard Thompson. Now this tiny room feels cozy and welcoming, and I just love it! It also checks my wallpaper box and makes me feel like our house fits in with all the cute Swedish Cottages I see online.
Swedish Cottage Dining Room
BEFORE
Other than the mudroom which we simply haven’t touched (and you won’t be seeing in this tour for that very reason), the Dining Room may be the room we’ve changed the least. But the way it FEELS is so unbelievably different. BEFORE, it had wood trim with a dark stain, a light fixture straight out of Pizza Hut, stained carpet, a built-in bench situation and a plastic, folding, accordion door circa 1974 Sunday School room. Also, as in every other room, was sporting a perfectly BLAH shade of greige that someone had recently applied to the entire house.
AFTER
As soon as we got the keys we ripped out the carpet in this room, removed the light, weird extra trim pieces, tore out the bench and baseboard heater. I quickly painted the window trim white, the walls a nice blue and Taylor installed the pine floors that run throughout the main floor. This room was my safe space when the rest of the house was torn to shreds for months and months, I had no kitchen and was living in a labyrinth of moving boxes. I could come in here, take a breath, and forget about the overwhelm waiting just a few feet away.
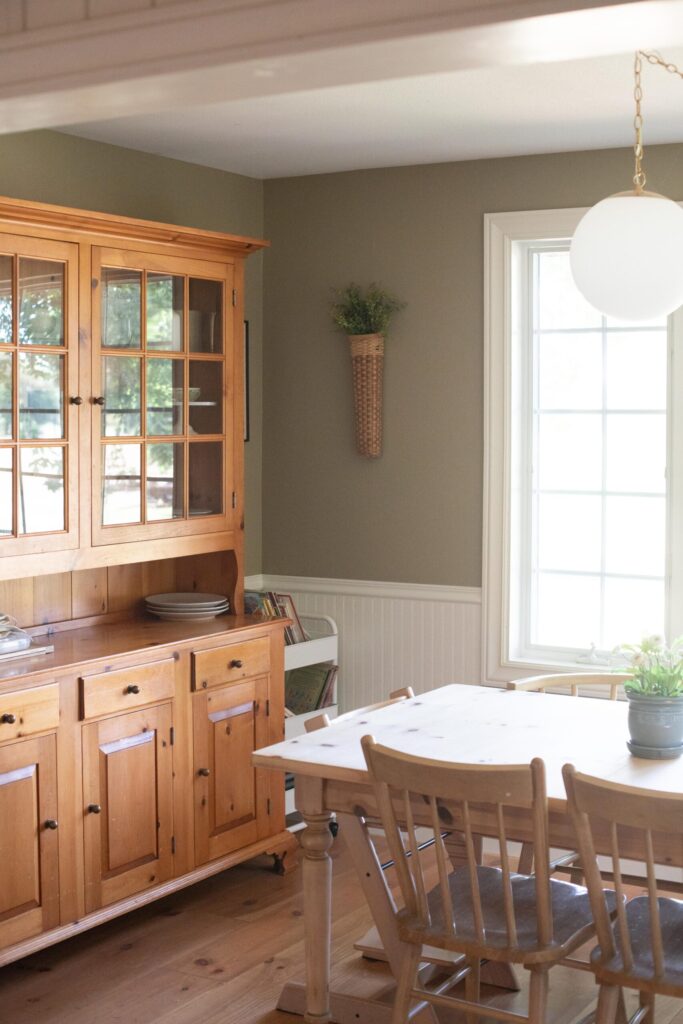
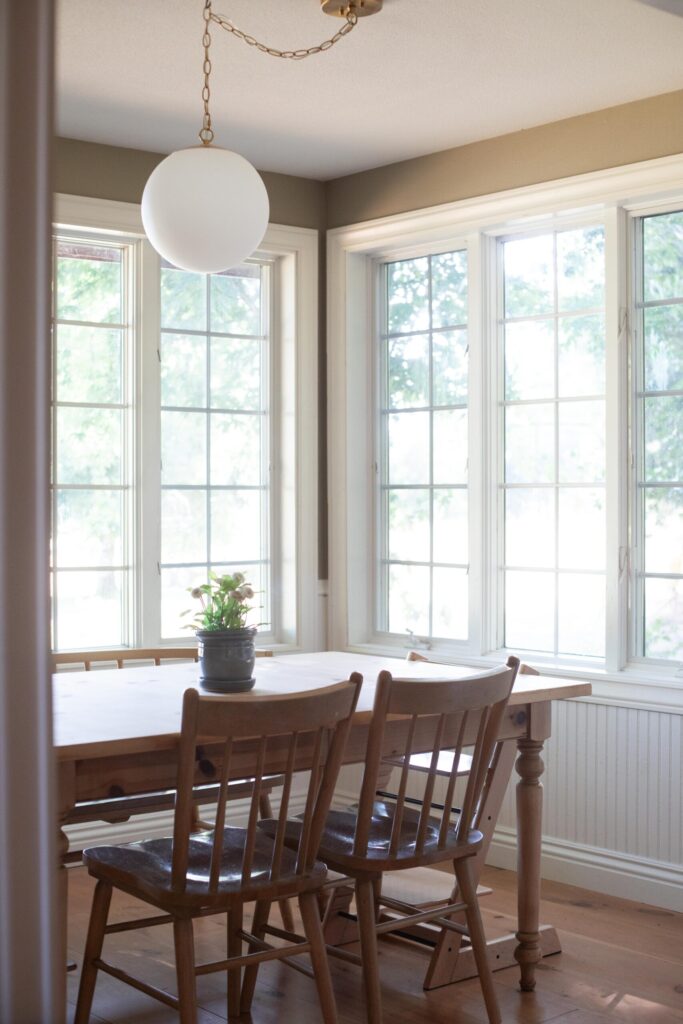
After a few paint color changes, we ended up adding a beadboard wainscot in here (painted with Sherwin Williams Alabaster) and applying Benjamin Moore’s Providence Olive up top to tie into the kitchen. This beautiful pine hutch we found in Bend via Craigslist, and spent one Mother’s Day driving down and back to retrieve it. Our pine table is also a Craigslist find. I paid $75 and just stripped it down this past summer. I’d love to strip the hutch someday, but that’ll have to wait. The chairs and bench are from the Hearth & Hand by Magnolia Shaker Collection and have held up super well.
I also tried several light fixtures along the way, but in our latest remodel, went with globe lights everywhere. I found this large pendant from an online shop located in Canada, and it’s absolutely perfect! The globes are what I see time and time again in Swedish Cottage photos, and I have really liked them.
We eat three meals a day in this space, do school here, play games, watch soccer, do crafts, hang with friends and it’s often where I shoot recipe photos. I love this room so very much, and I hope you do too!
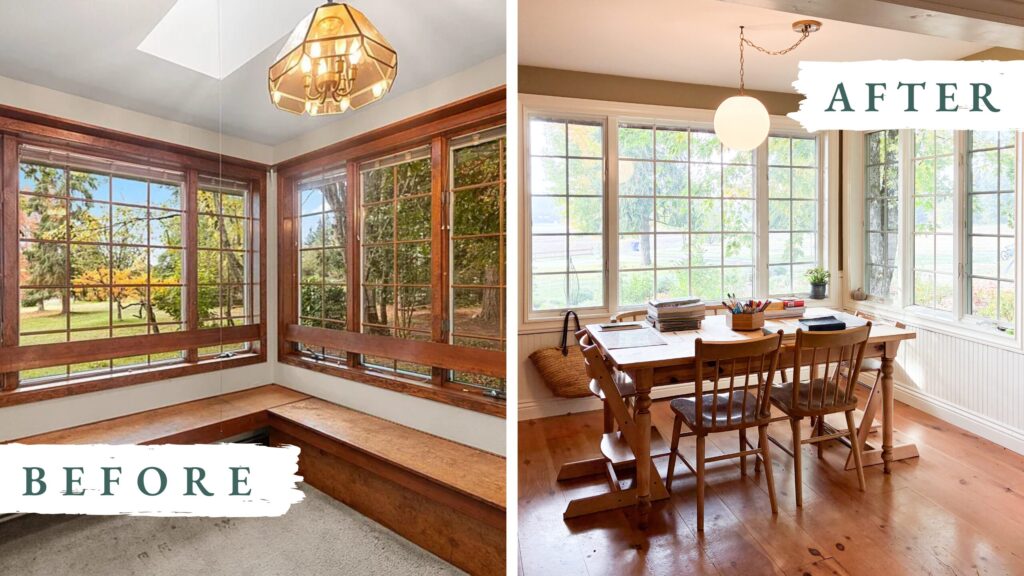
Swedish Cottage Sunroom
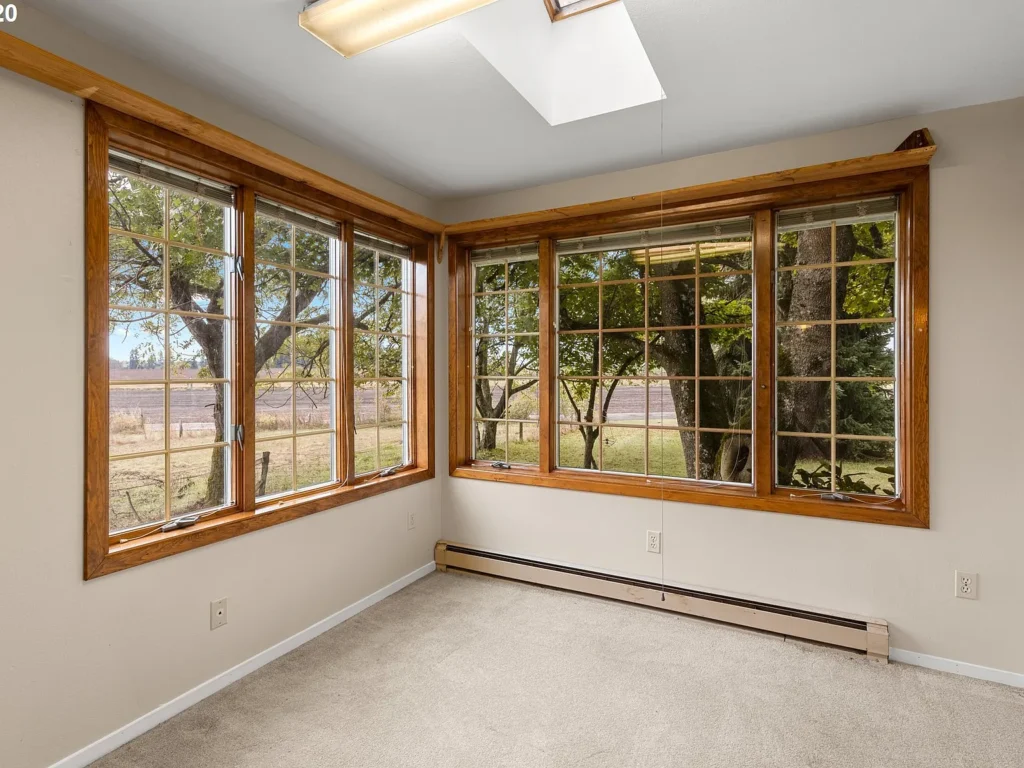
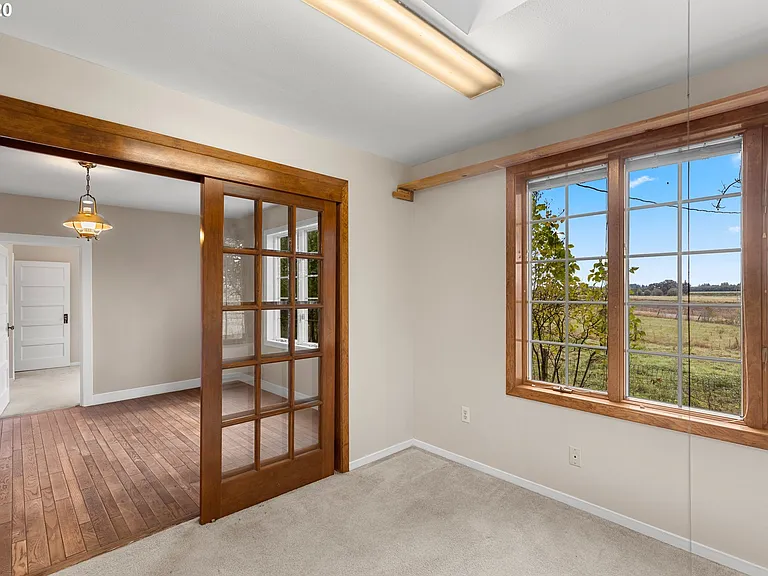
BEFORE
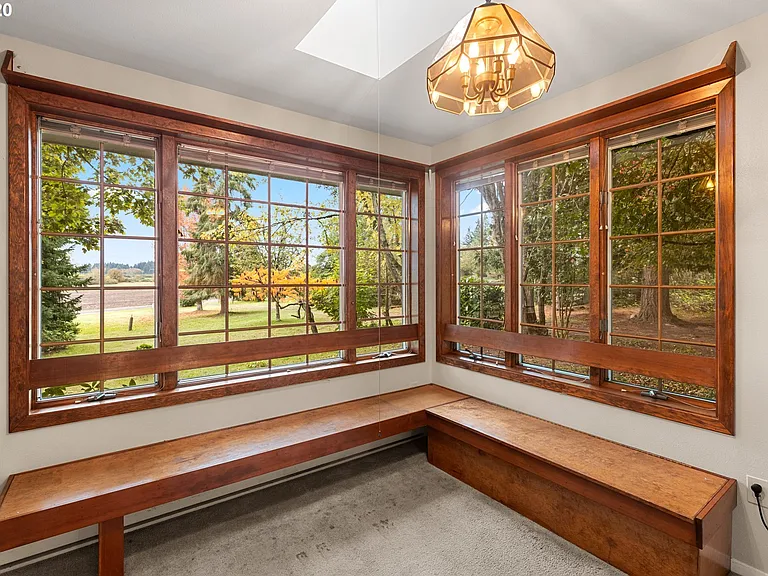
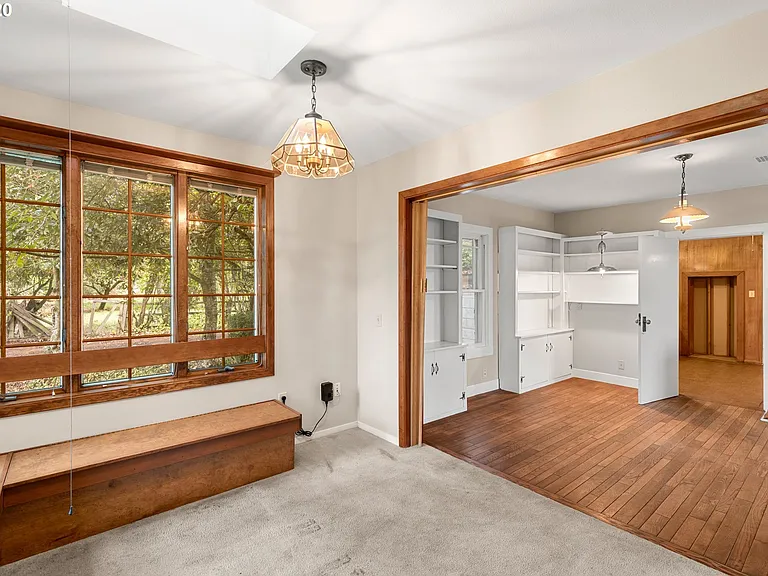
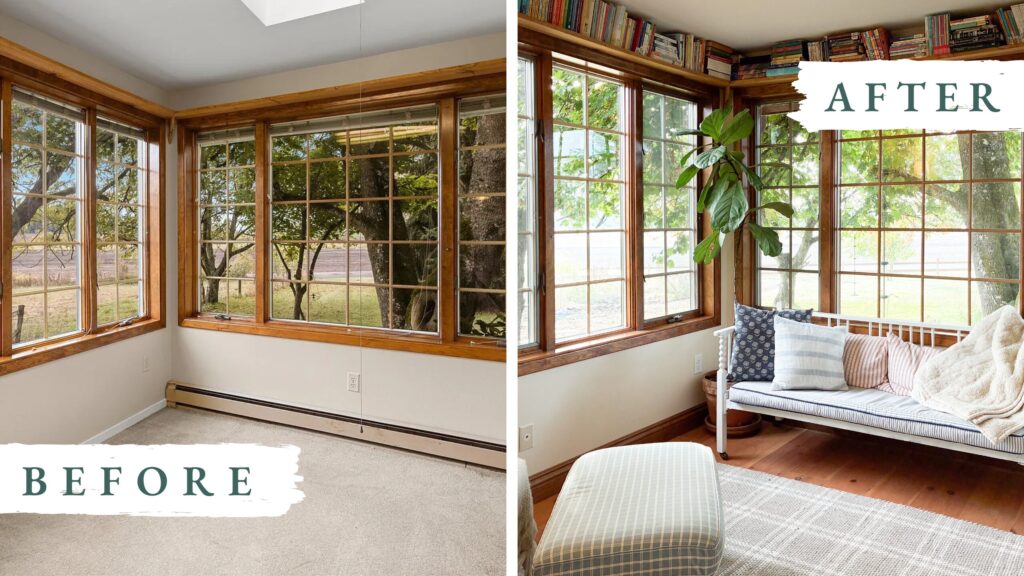
While we still have a few projects remaining in this room, this is one of the spaces I have come to enjoy most in our home. Here’s how it started: dark window trim, greige paint, dark wood doors, fluorescent lighting and grungy carpet.
At times, I have envisioned a big window seat in here, or even a personal office space. But I’m super glad neither of those visions panned out, because where we’ve ended up is even better. When we first moved in, this room housed the towers of boxes while we unpacked. After that it briefly became a schoolroom before I realized we never actually did school anywhere but the dining room table. Then it was taken over by toys and books, so Taylor built a bookshelf wall that houses our entire library. He added the same pine floors that are everywhere else, and we changed the paint and light fixture.
AFTER
Since we remodeled this summer, this space has become the Swedish Cottage Sunroom of my dreams! We still have plenty of painting to do in here- walls, ceiling, window trim and the built-in bookshelf Taylor built, but even unfinished, it’s just such a lovely space. Full of light, with beautiful views, I start my day in here every morning. A perfect place to read my devotions and say my prayers, surrounded by the beauty of God’s creation and all my favorite books.
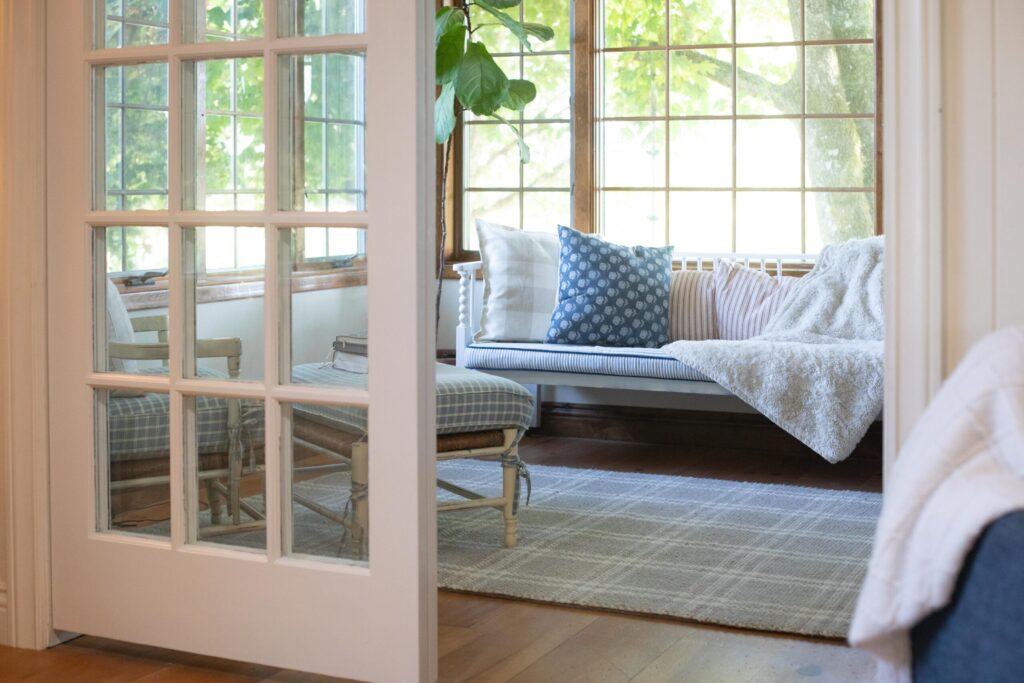
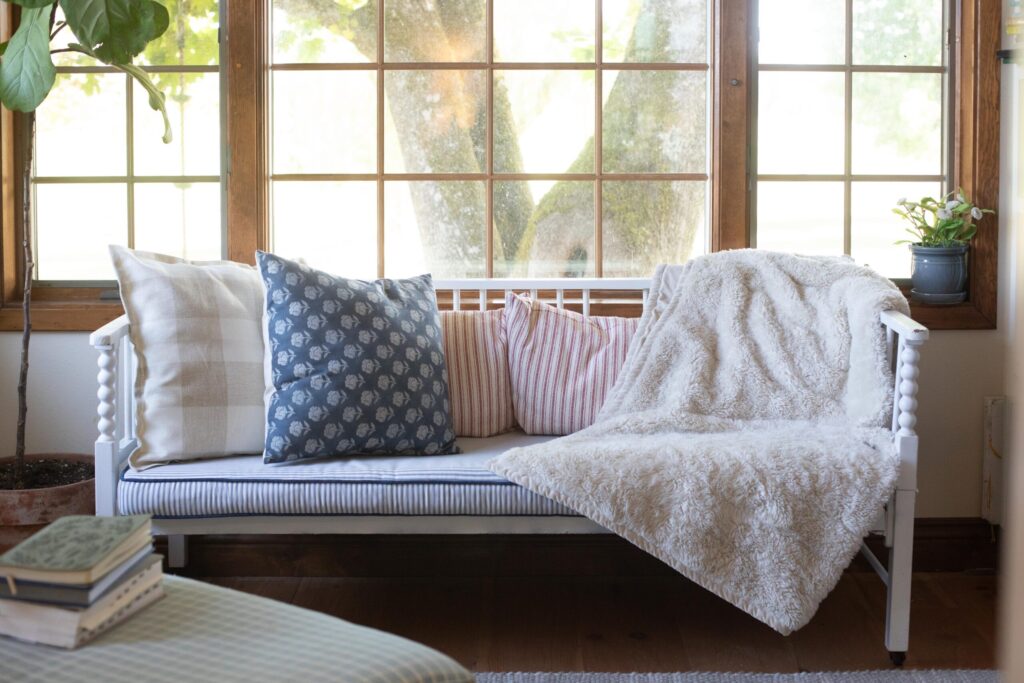
All three of my guys also love this space, and at any point, you can probably find one of them in here either curled up with a good read, searching the shelves for an old favorite or catching a quick snooze in the sunshine. It’s a magical spot!
Swedish Cottage Living Room
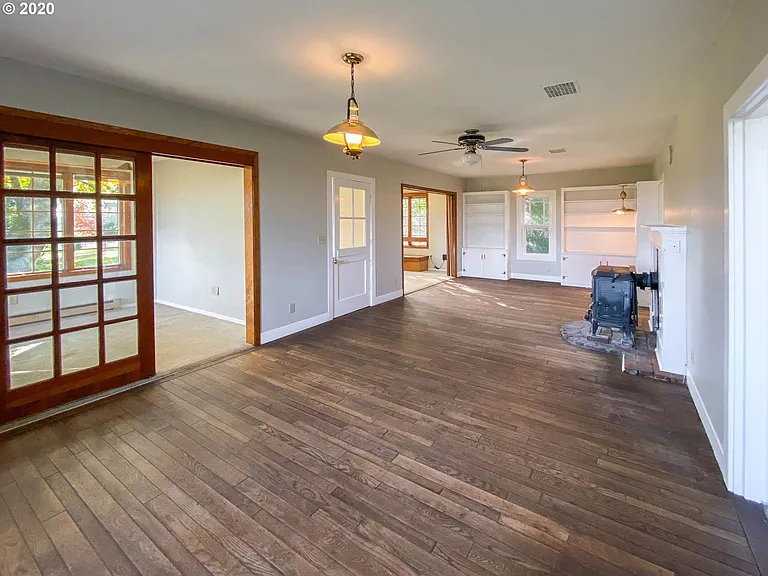
BEFORE
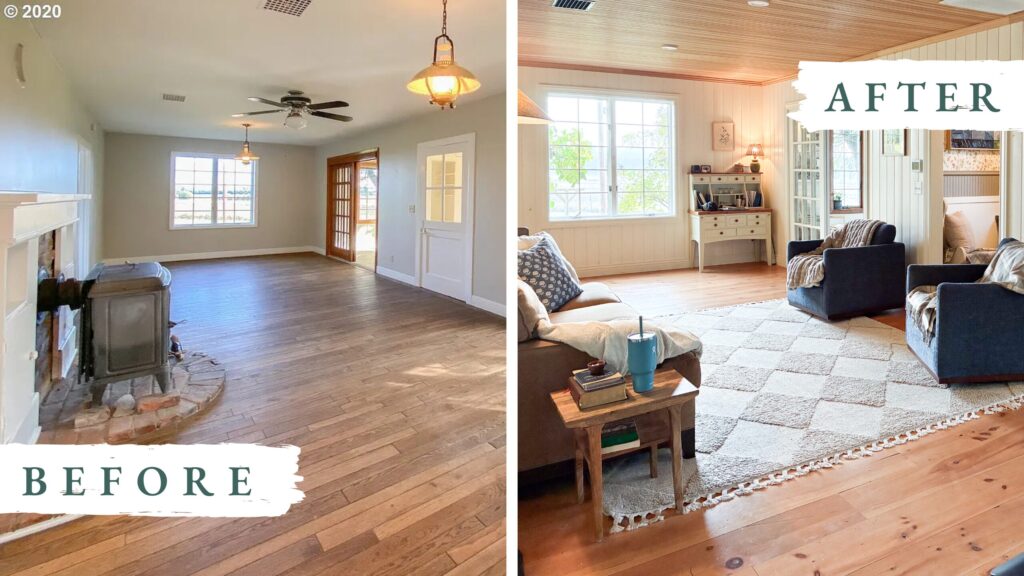
Our living room has been a CHALLENGE. With 5 openings and two windows, there was hardly any place to put furniture. It is also long and narrow and very easily looks overcrowded.
It took me 3 full years and several mistakes to get it right. My first mistake, was tearing off all the drywall in this space, thinking we could expose the original shiplap beneath. After attempting to strip off the ancient wallpaper from a small section without much success, I realized it wasn’t going to happen. Not to mention, the shiplap wasn’t in very good condition. We lived in the house for over a year with walls that looked like they’d been through a paper shredder. Oops.

AFTER
Eventually, my Dad offered us some vertical grain fir paneling he’d saved from a construction project, so we decided that would be perfect for our Swedish Cottage vibe and installed it on the torn-up ceilings. It’s so cozy and absolutely beautiful. We then decided to use a larger, paint-grade, pine tongue and groove on the walls, and I just LOVE how it looks in here. It is SO easy to wipe clean and take care of. These walls take a beating with two boys (and endless soccer balls), and I’m so grateful the whole space is solid wood.
All the floors on the main level were replaced with wide-plank pine, including in the living room. Then, after installing all the wood paneling on the walls and ceiling, we trimmed everything out and ended up painting the walls white. We covered up a totally unnecessary door that led to the guest room. We also covered up the small window behind the wood stove when we did the paneling, as it wasn’t in a great spot and looked funny. Just this summer in our recent remodel, we removed the semi-flush mount light fixtures and put in these puck lights. I like how they don’t intrude into the space, making a short ceiling feel even shorter.
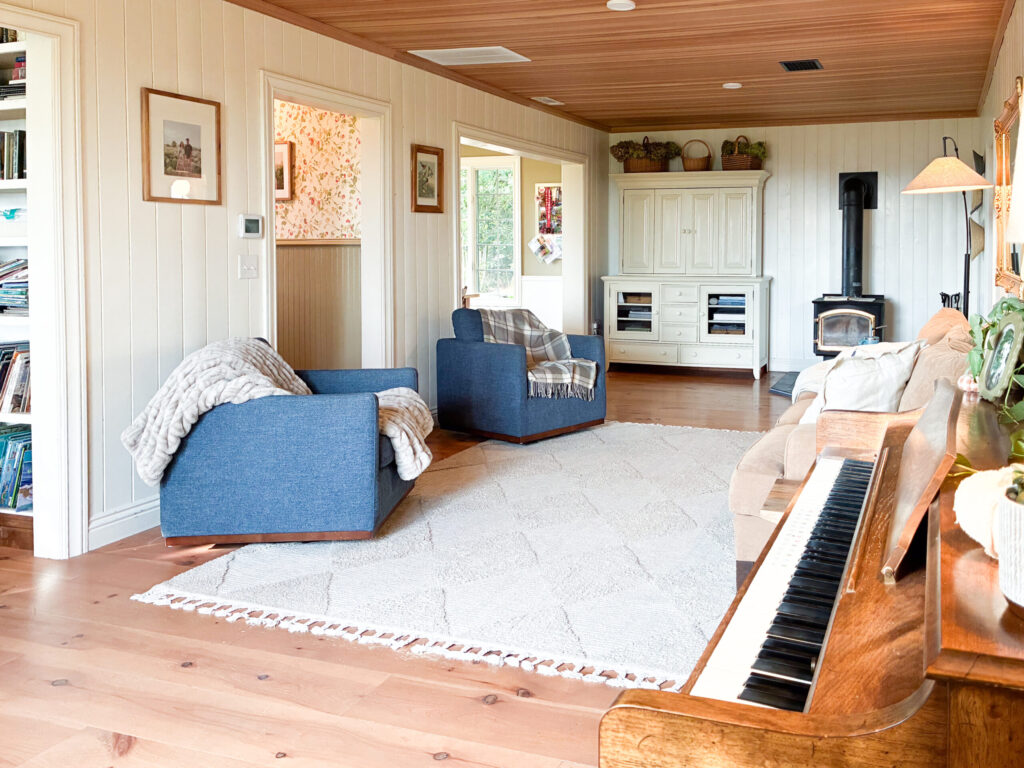
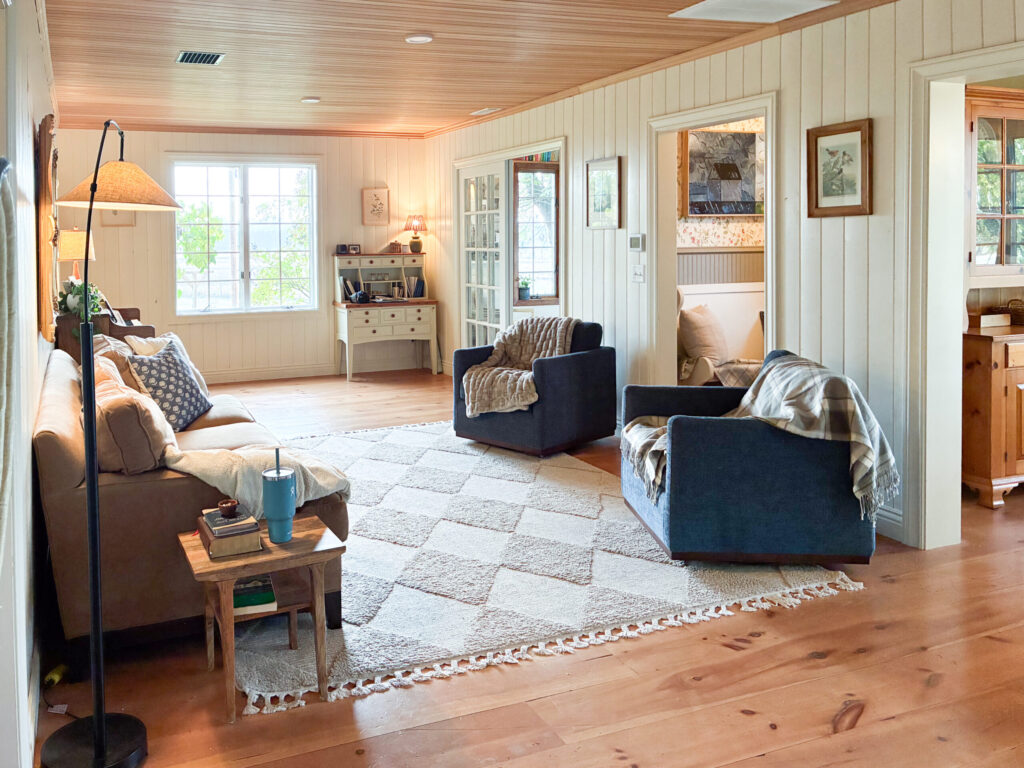
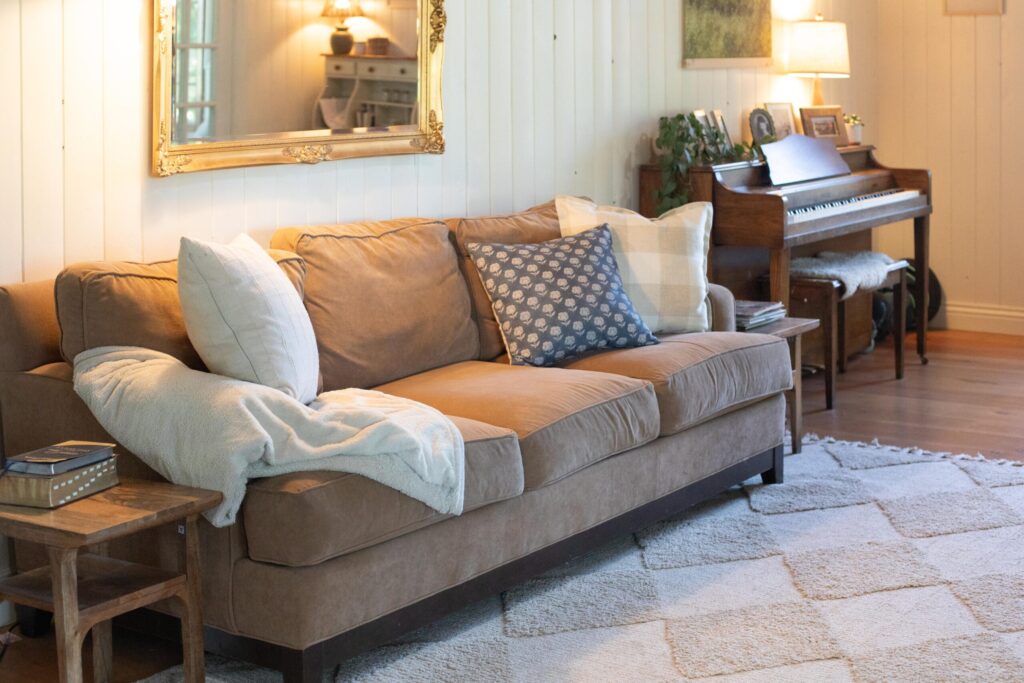
Finding the vintage Pottery Barn TV armoire was a game changer for us in this space. Not only does it balance out the off-center wood stove, but it grounds the room and makes it feel finished. I painted it in Abingdon Putty by Benjamin Moore, which is also the color I painted my childhood desk in the opposite corner of the room. We also added some swivel chairs to make watching soccer games easier, and though I’m not crazy about the blue- I’d prefer something light and creamy- they’ve been perfect with two grubby boys.
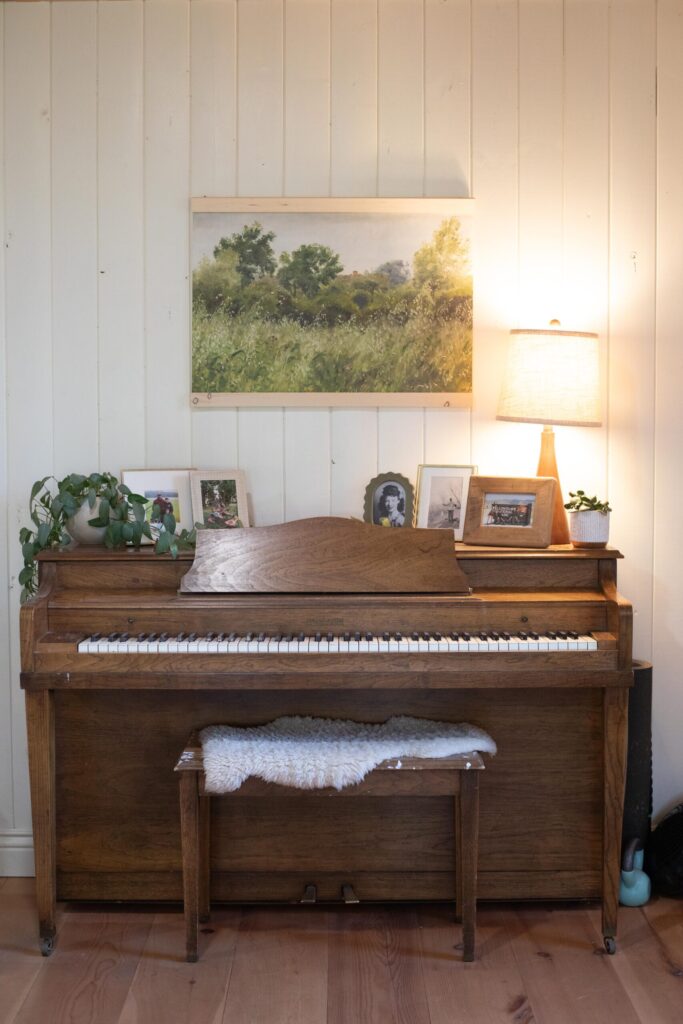
Under my Grandma’s mirror, we have a secondhand Ethan Allen sofa we paid $200 for on Craigslist, and it too has taken a licking and keeps on ticking. I sourced this rug from Target last Spring, and even though it’s light, it doesn’t show dirt. A free piano from Marketplace, some inexpensive side tables from Urban Outfitters, the stove from my childhood home and a couple thrifted lamps make this room so easy to relax in. And throw blankets and pillows! Don’t forget those!
I still have some big dreams for this space: a window seat, stone fireplace, mantle, built-ins, and some small windows on each side of the fireplace. Infusing even more Swedish Cottage vibes. But for now, it feels so good to have it clean, finished, cozy and functional.
Swedish Cottage Kitchen
BEFORE
This room might still be the most dramatic transformation in the whole dang house. And though I’ve shared lots of photos of it, it never grows old seeing how much it’s changed.
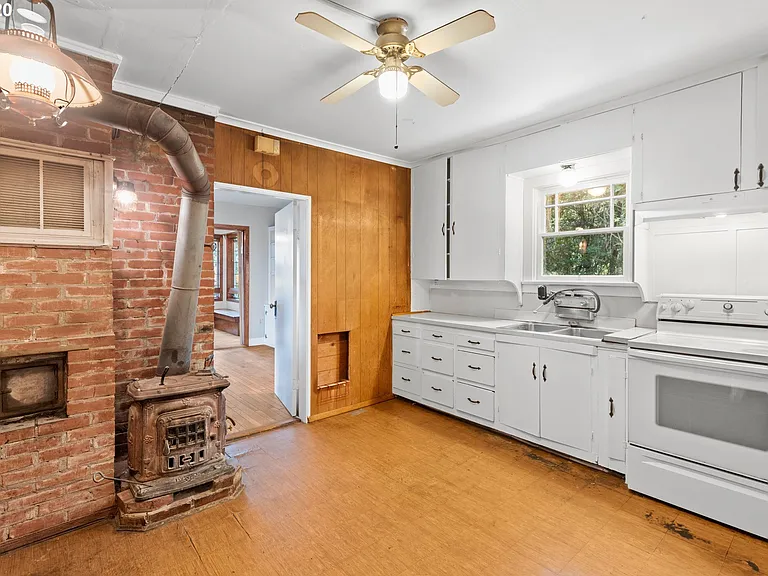
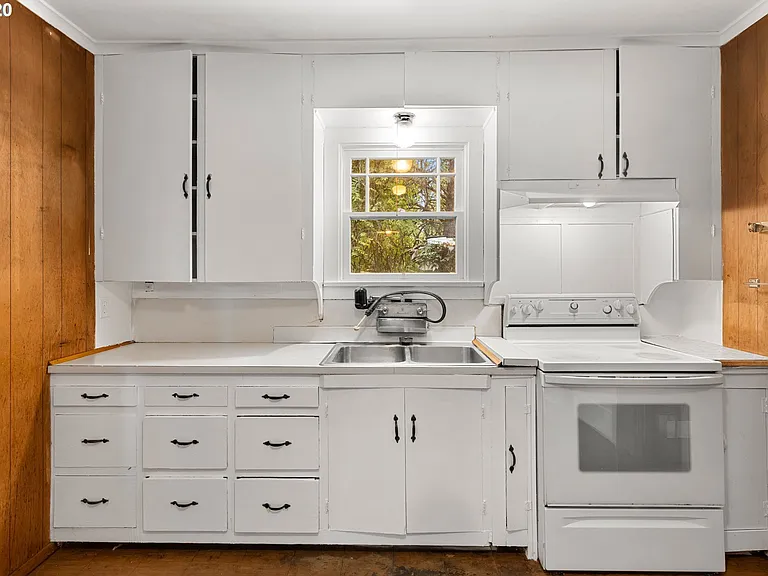
When we moved in, this room was SO DARK, despite whatever voodoo the real estate photographer employed to get these photos. There was one small window, one wall of wonky plywood cabinets, a rusty sink and crappy stove. And the remaining three walls were covered in dark wood paneling. As you can see from the photos, there was an ancient wood stove in the kitchen and large brick chimney, which was shared by the wood stove that used to be in the living room. Not pictured are: the 1960’s sized fridge nook that indented into the neighboring mudroom, and the piles of mice poop in every corner. YUCK!
Before we moved in, we gutted this room as much as we could. The paneling came off, the drywall came off the ceiling and we removed the stove and as much of the brick as we could. Then, we lived without a kitchen for the first couple of months, as we wracked our brains with how to best utilize this space.
DURING
This is the only space getting a “during” section, but that’s because I want to show you how the design process goes sometimes. Sometimes you get it wrong, friends. Sometimes you put up beautiful wallpaper that ends up making a tiny room feel like it’s full of buzzing bees. Sometimes you pick a paint color you love and in the space it turns sickeningly sweet. Sometimes you try to head in a different direction, only to end up feeling weighed down by the dark and heavy colors. And sometimes you redo your kitchen three times before you get it right.
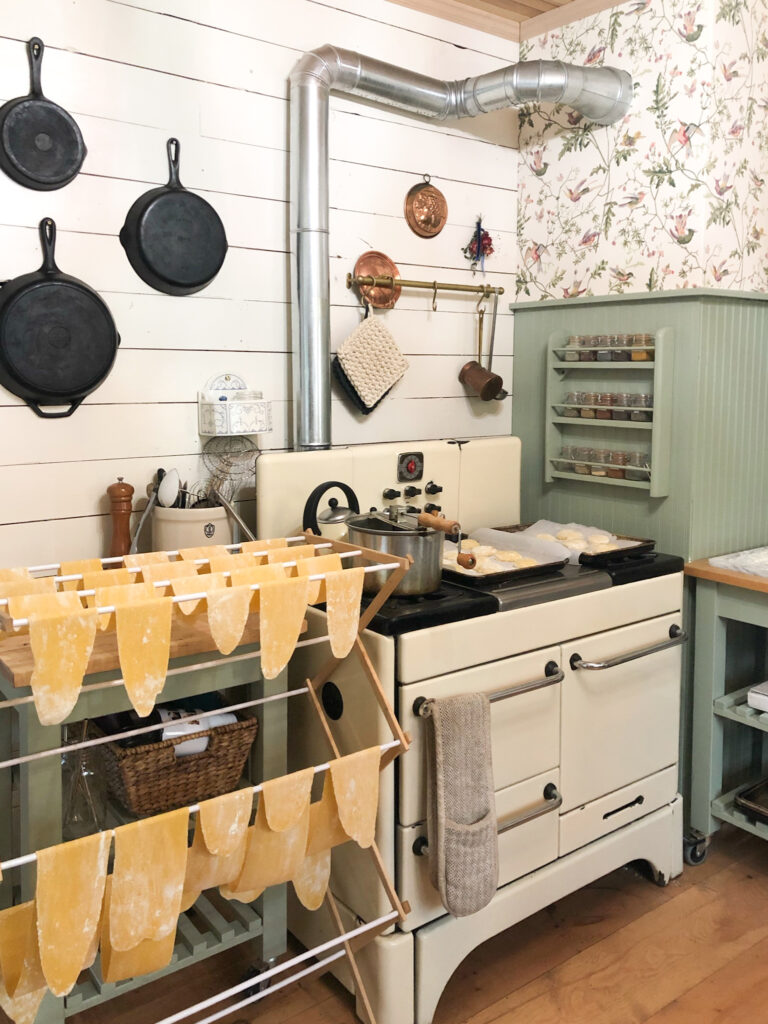
Version 1.0– Coming off of our last house, I was very into English Cottage style. Even though I had already printed out an inspiration photo of a cute, red Swedish Cottage, I didn’t know how to execute that style yet. Our stripped-down, 1947 post-war cottage lent itself well to busier prints, brighter color and more formal pieces. I loved the wallpaper, I wanted a sage green, I love flowers and antiques, but all thrown together and applied in this house, it felt way too loud, busy and overwhelming. Not to mention a little cloyingly sweet and cutesy.
Version 2.0– This version was a swing in the polar opposite direction. Nothing like a dramatic change. I painted over the wallpaper, which calmed things down appropriately, but then went waaaaaaay too dark and missed the mark on the paint color. Again. I was discovering the lighting in this space was really tough to work with! I was going for rustic PNW cabin vibes, but it ended up feeling way too dark and depressing in here.
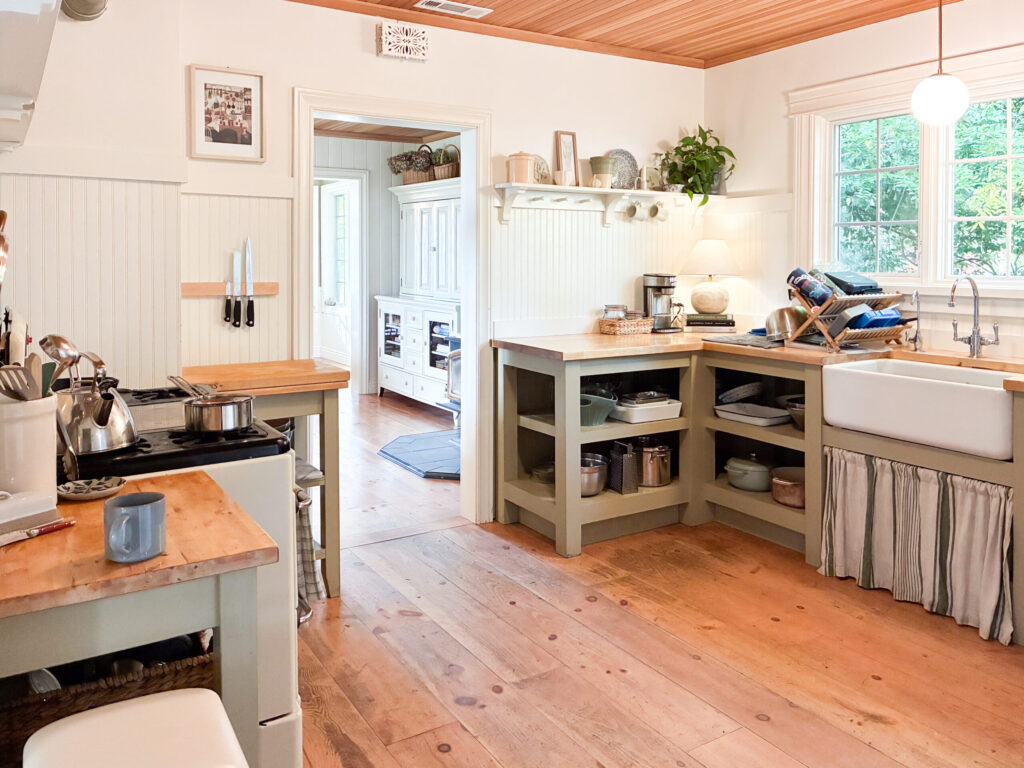
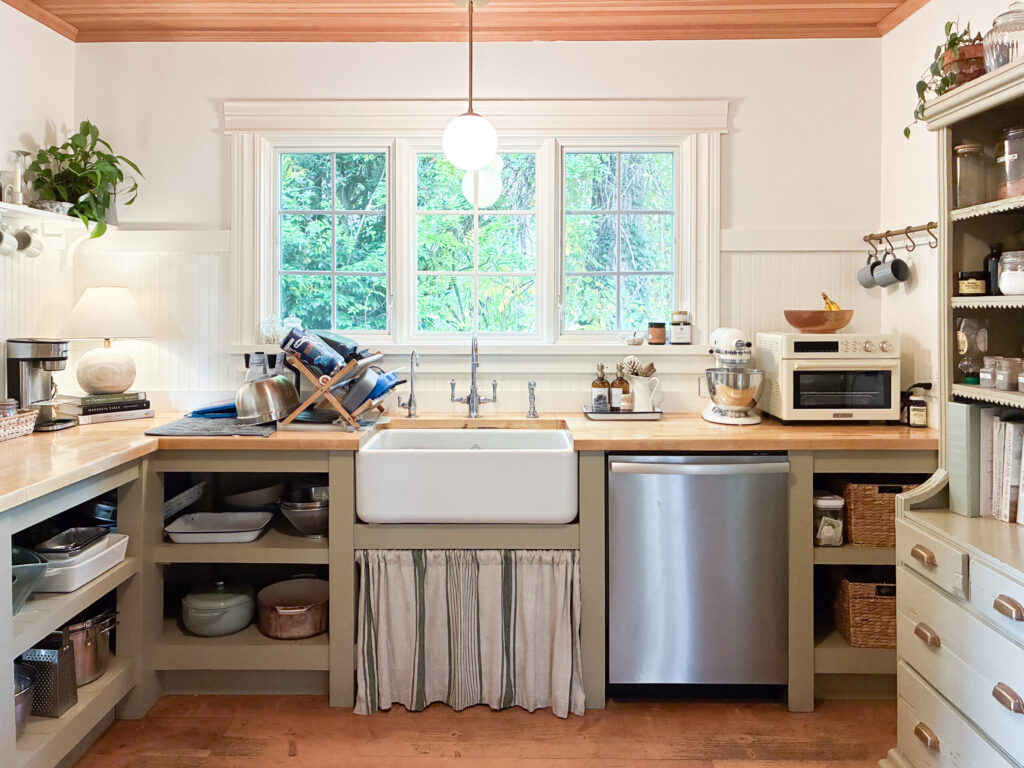
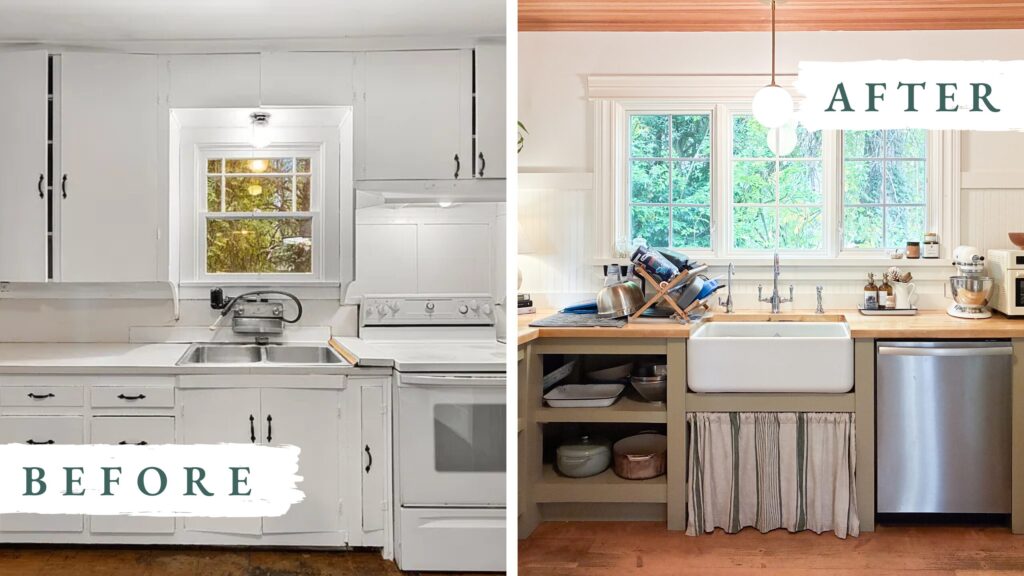
AFTER
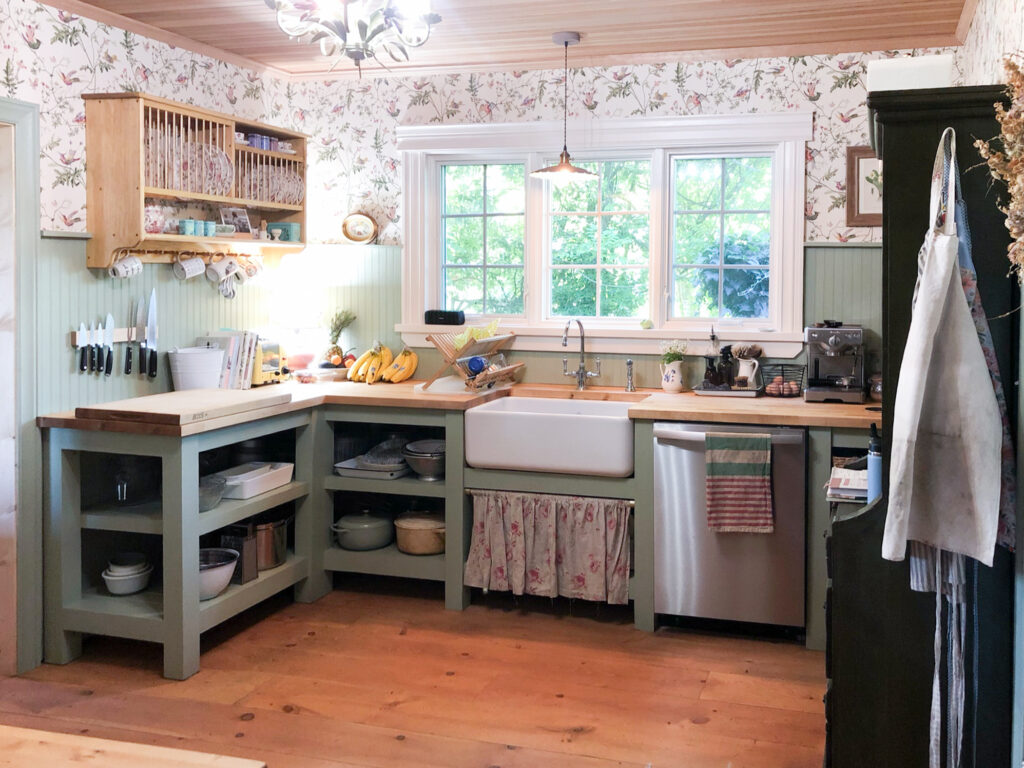
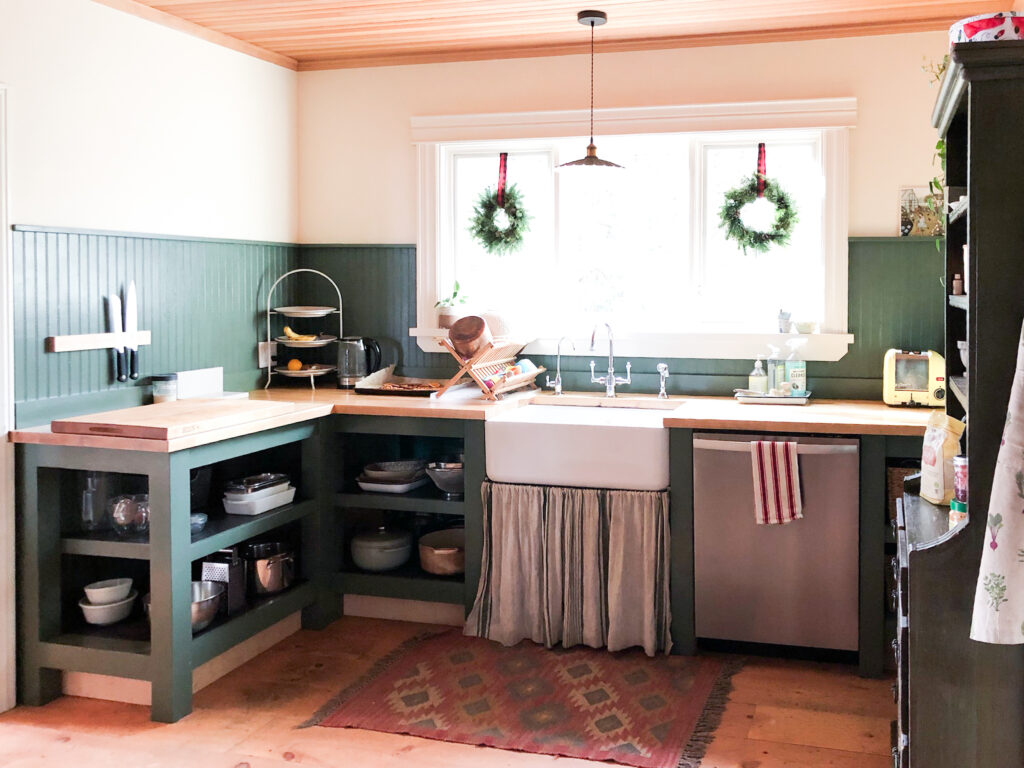
As you can see, it took a lot of trial and error to get where we are now. Three different colors of green. Wallpaper, then no wallpaper. Different light fixtures, different shelving options and different decor. It’s been a LOT harder than I thought to implement the restrained Swedish Cottage style. To be perfectly honest, I have felt some shame and embarrassment about how many times I’ve changed this room around, but that’s just how it goes sometimes, my friends. And in my defense, I did get the big things right!
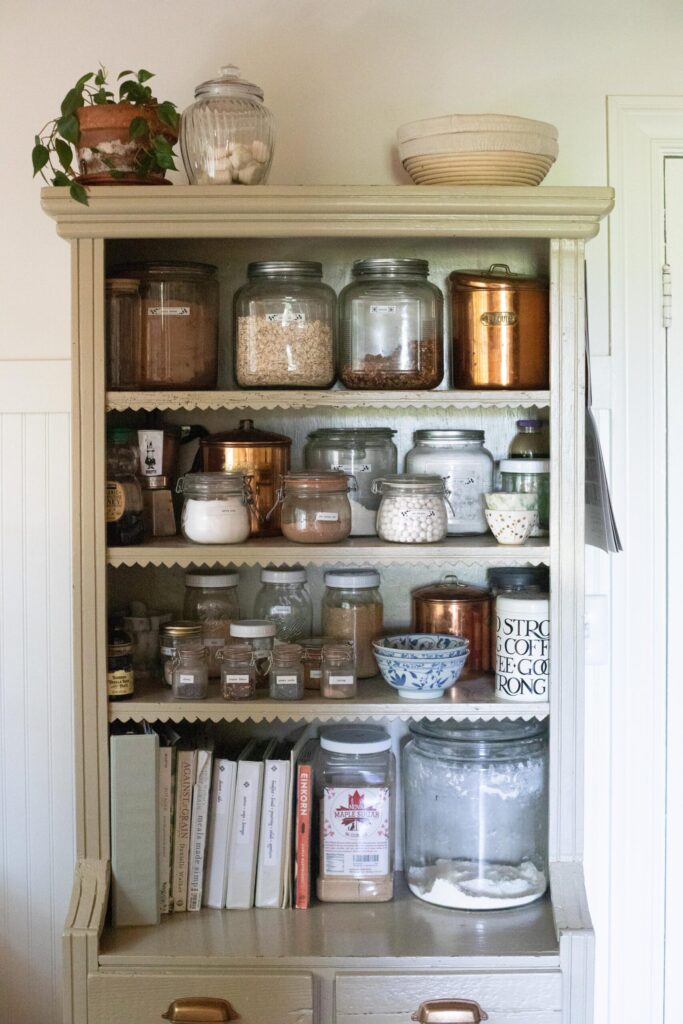
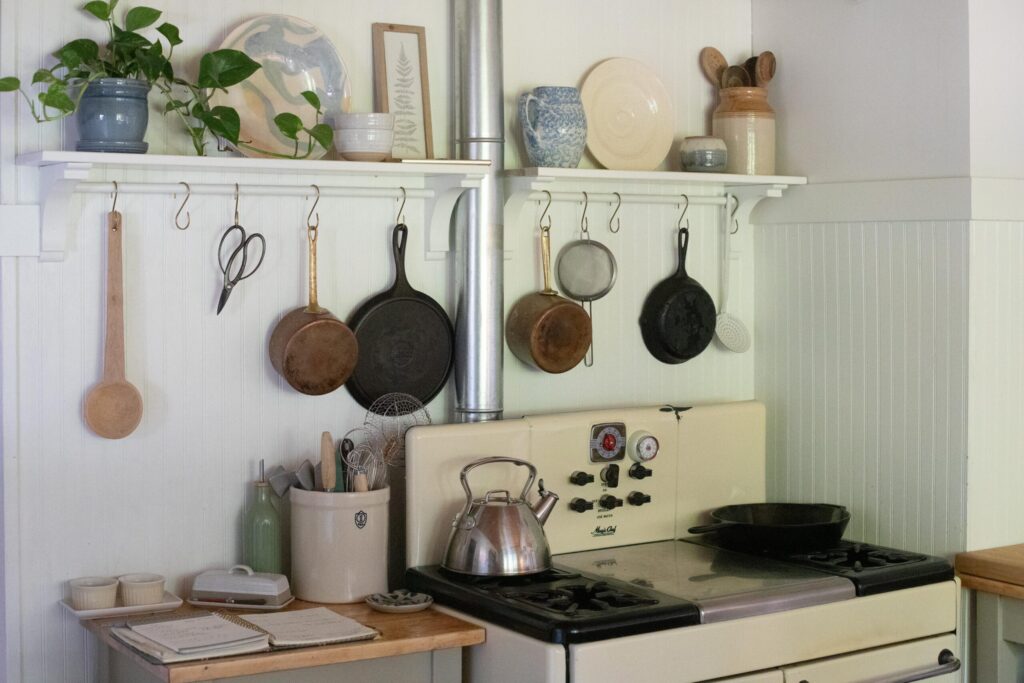
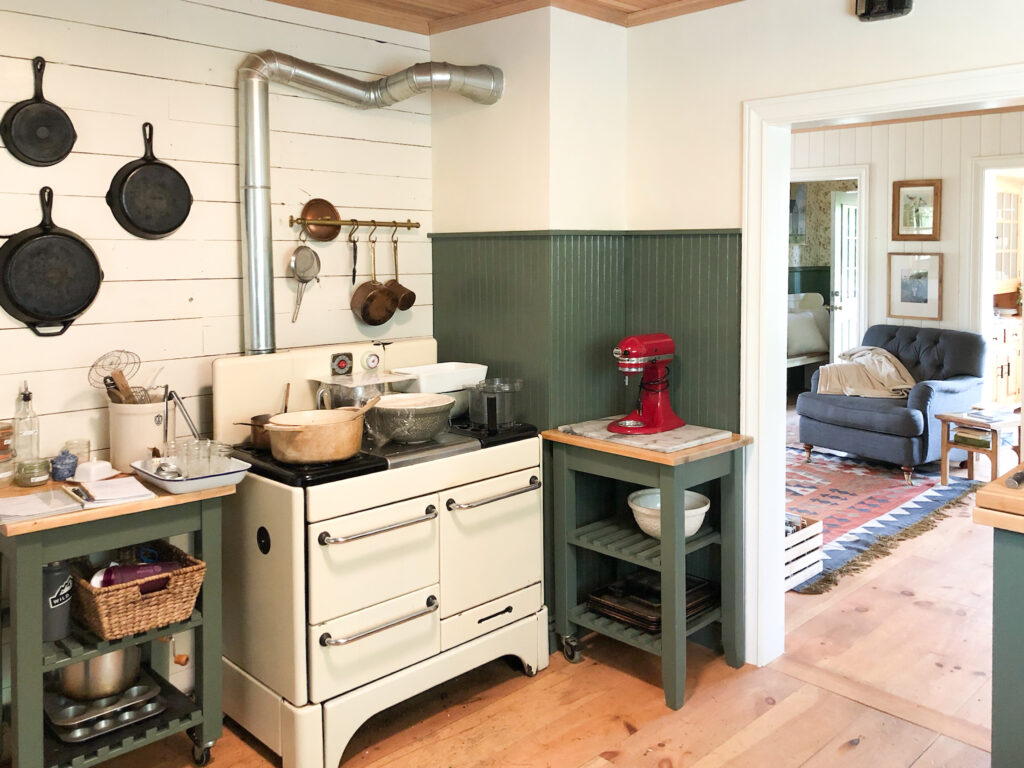
Going with open shelves above and below (and kitchen carts painted to match) saved us a lot of much-needed money in this remodel. My Dad built and installed our custom Swedish Cottage “cabinets” and they have worked very well, and are so well made. I still love the Shaw farm sink I picked and the classic chrome faucet. Putting in a new window, three times as large, brought in much-needed light and openness. I still love my Grandma’s stove, old and quirky as she is, and she’s still chugging along, pumping out three homemade meals a day. The freestanding cabinet I thrifted for $75, and while it has been painted a couple times, it was a perfect choice for this space and has worked super well.
In this humble little Swedish Cottage kitchen, I have produced some beautiful meals, dozens of baked goods and canned hundreds of jars of food. I wouldn’t mind a few upgrades at some point in the future, but all-in-all, she’s a great little kitchen and I really enjoy cooking here.
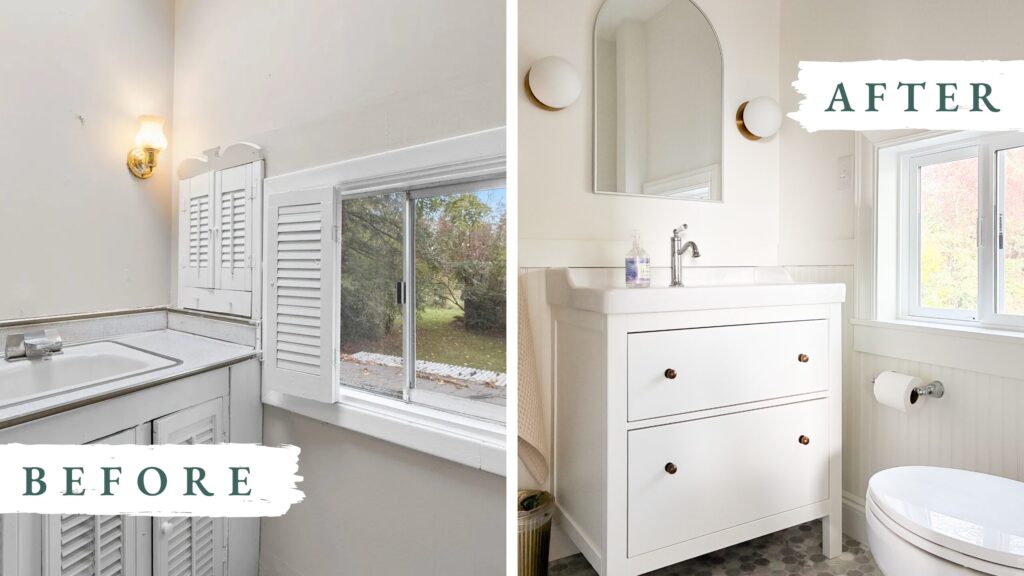
Swedish Cottage Bathroom
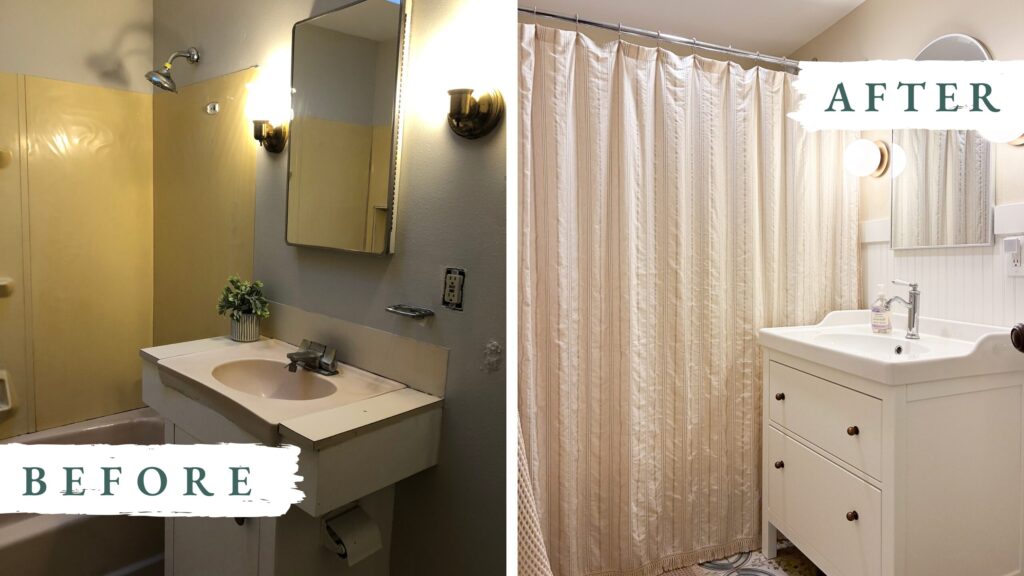
BEFORE
I’m not sure I can say anything else before I just say “PRAISE THE LORD!” we are no longer in the BEFORE stage of our bathrooms. This summer’s remodel included BOTH bathrooms, one of which (upstairs) had been bolted shut since we moved in. Our bathrooms were BAD five years ago when we moved in, and trust me, they hadn’t gotten any better thanks to us.
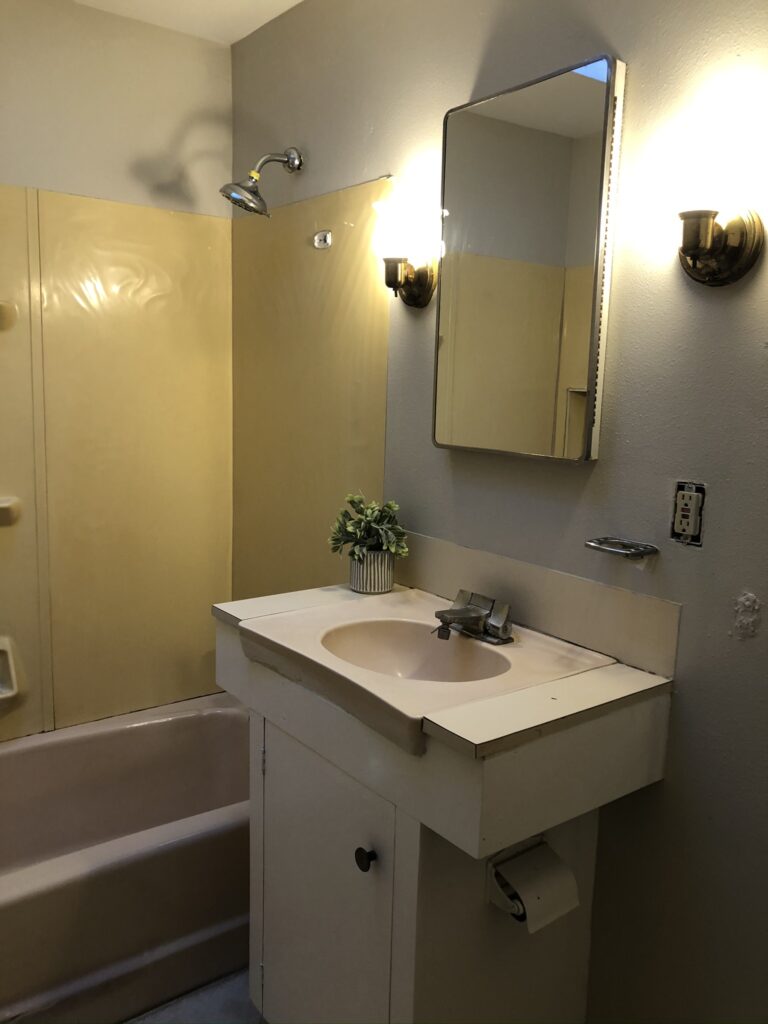
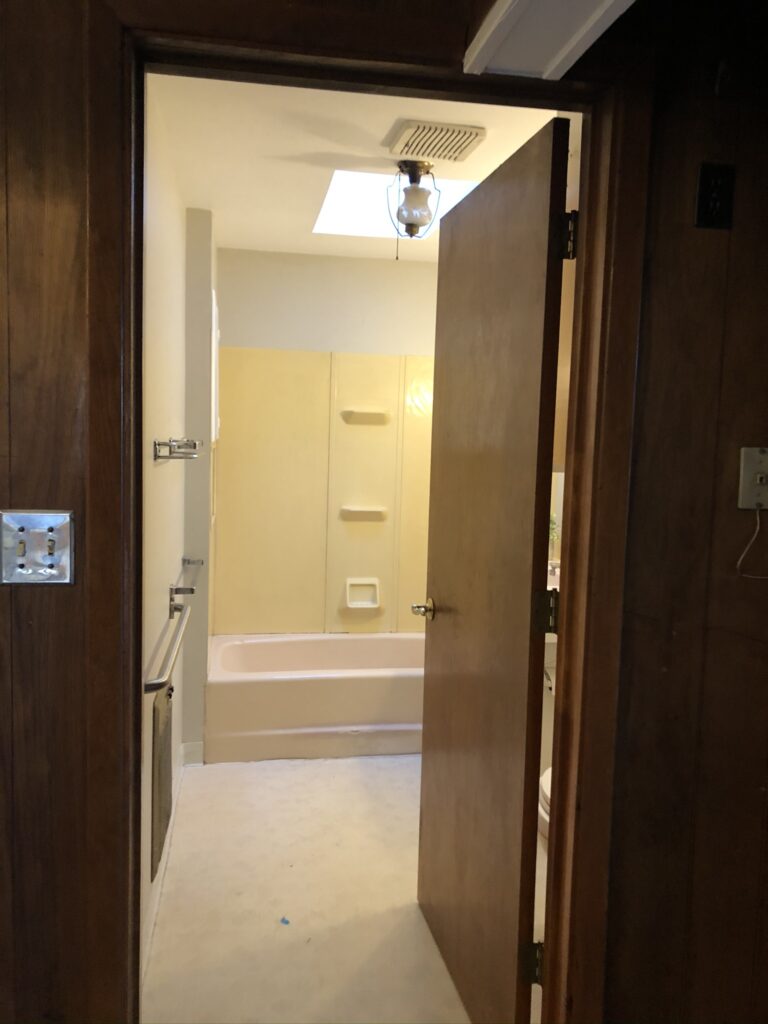
Here’s what the downstairs bathroom looked like when we moved in: plastic yellow shower surround, broken down metal bath fixtures, rotten linoleum floors, hard water stained sinks and toilets, puke pink tub, homemade vanity and creepy flickering lights.

AFTER
Do you know what it’s like to shower in a clean, new bathroom after almost 5 years of closing your eyes tight in the bath and pretending you were somewhere else? Do you know what it’s like to clean a toilet that actually looks clean afterwards? Do you know what it’s like to get ready in a light, bright bathroom after years of applying mascara in the dark? It’s pretty freaking magical, friends. And I find myself unbelievably grateful every single day.
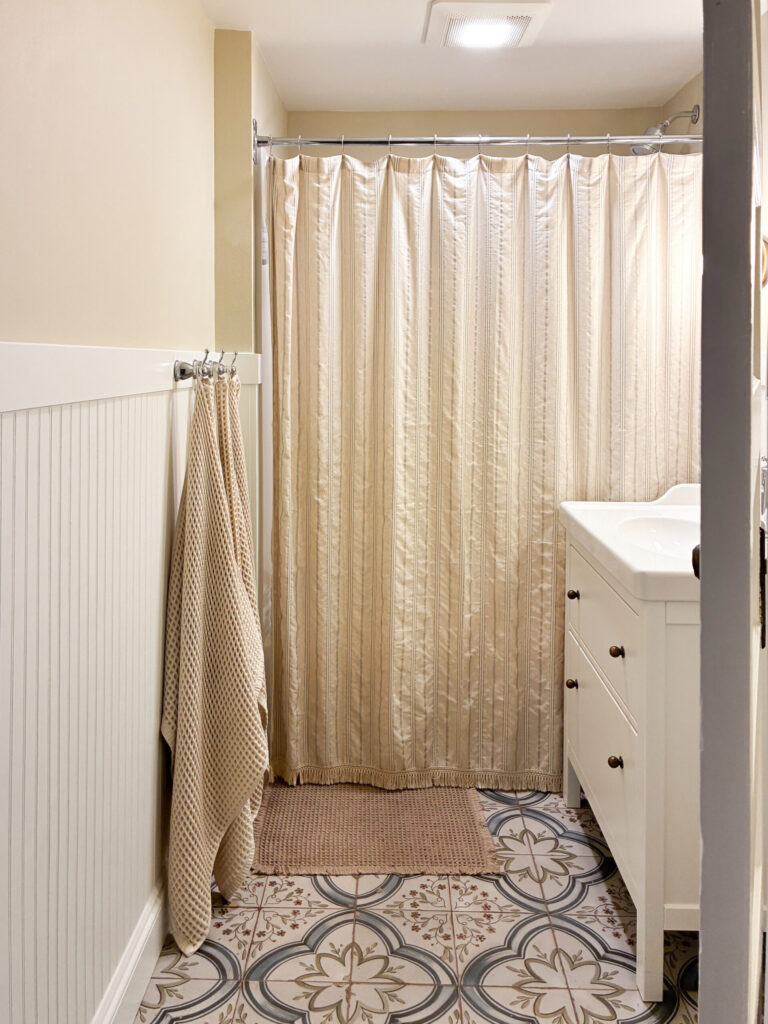
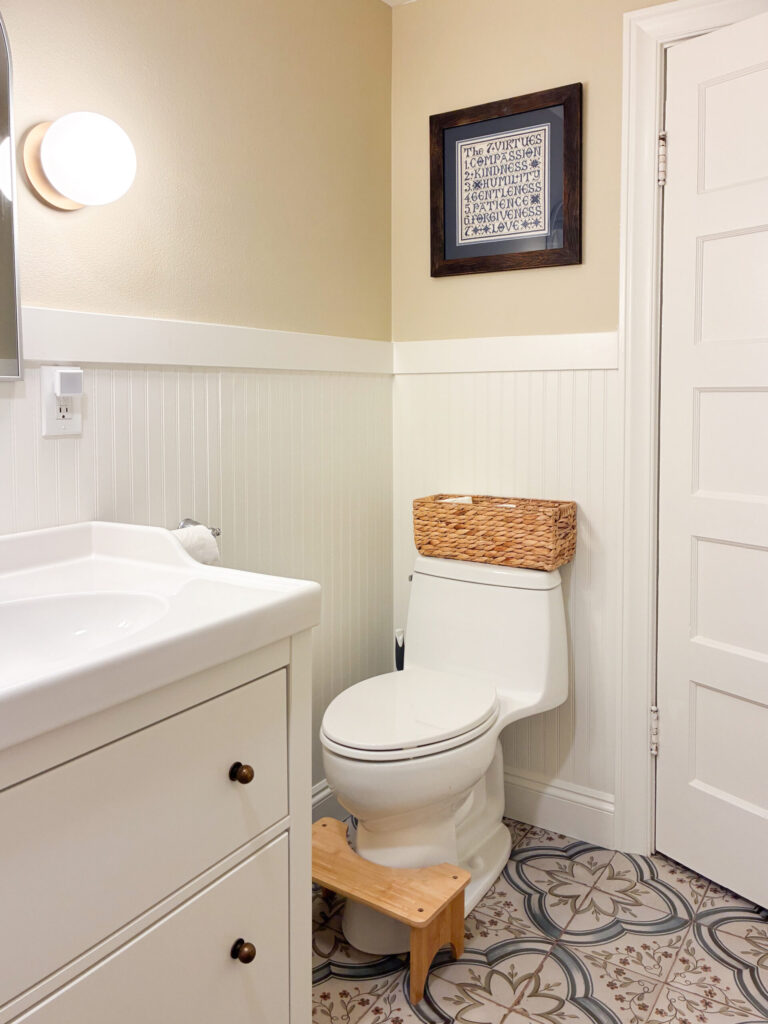
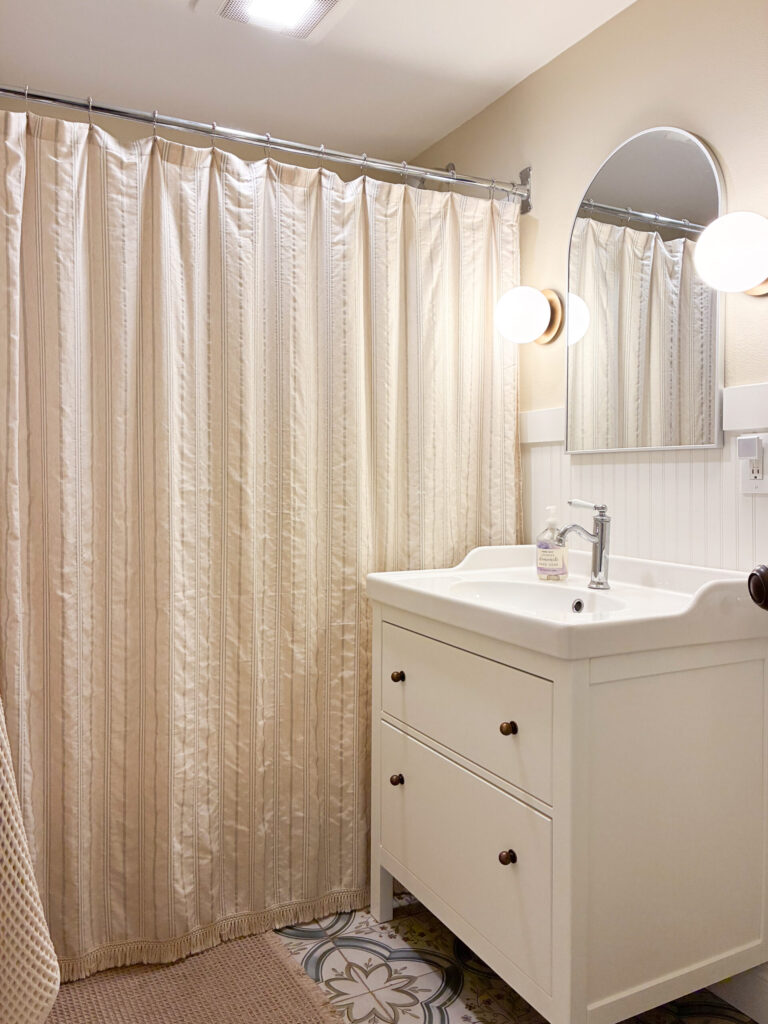
This summer we took this bathroom down to the studs. You can read more about that process and see some behind-the-scenes photos here. We put in new walls and a beadboard wainscot, a new tile floor, a new shower surround, a new sink and vanity, new lights, a new toilet and a fun arched mirror.
I don’t think I can overstate what an incredible upgrade this has been, and how much it impacts our daily life. It’s such a clean, bright, beautiful space, and “I’m grateful,” just doesn’t seem to cover it. No more do I have to keep this door closed, no more do I have to be ashamed when a guest needs to pee. I even leave the light on in here just so I can see this pretty space from where I work in the kitchen. WHAT A BLESSING!
The thing that makes me most happy is that I was able to source the exact sink, vanity and faucet in one of my favorite Swedish Cottage bathroom inspiration photos.
Swedish Cottage Primary Bedroom > Playroom
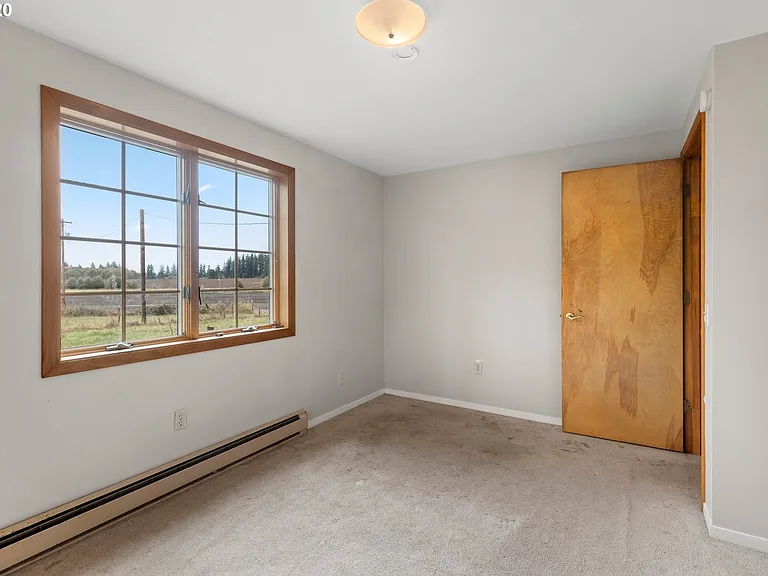
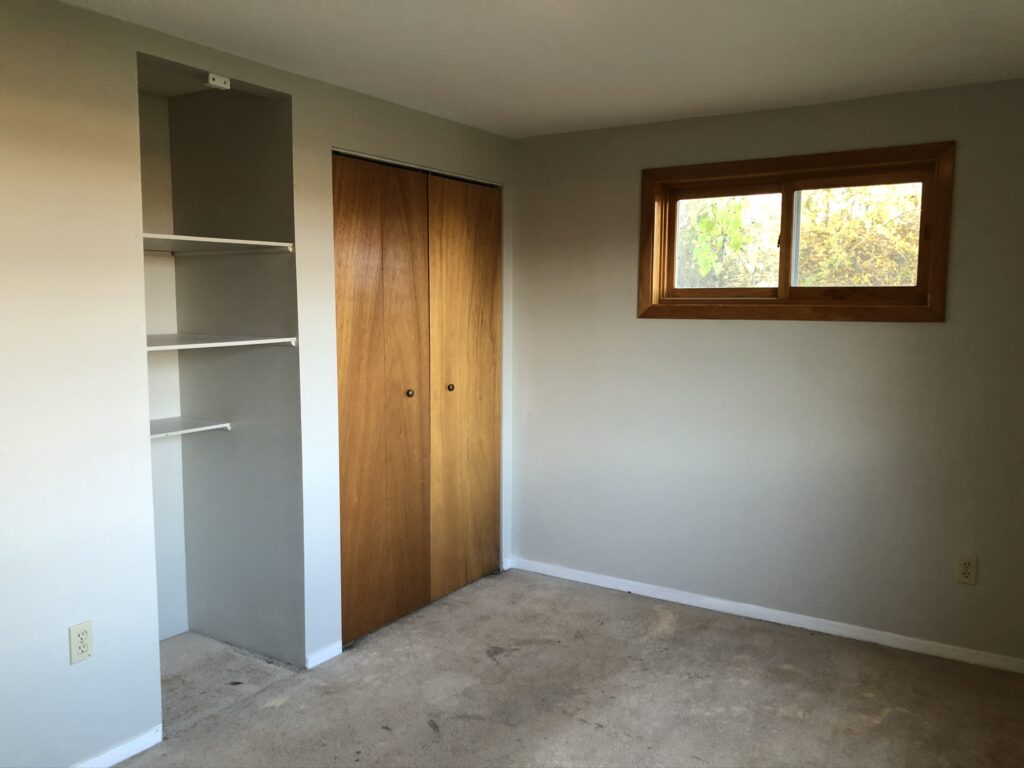
BEFORE
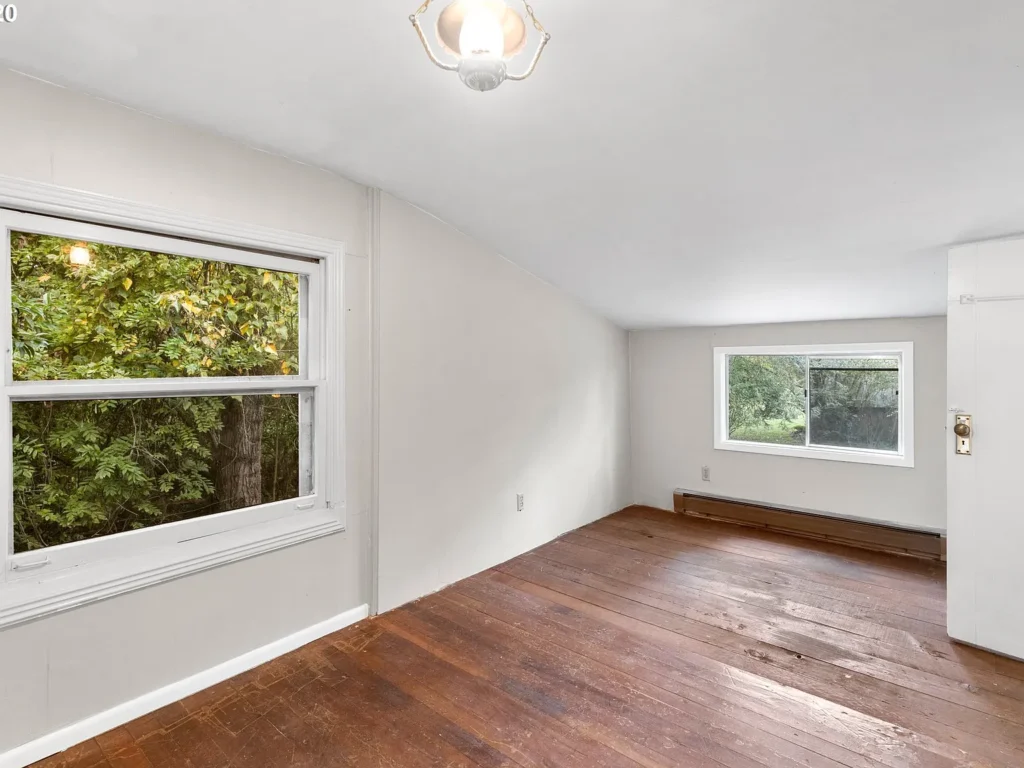
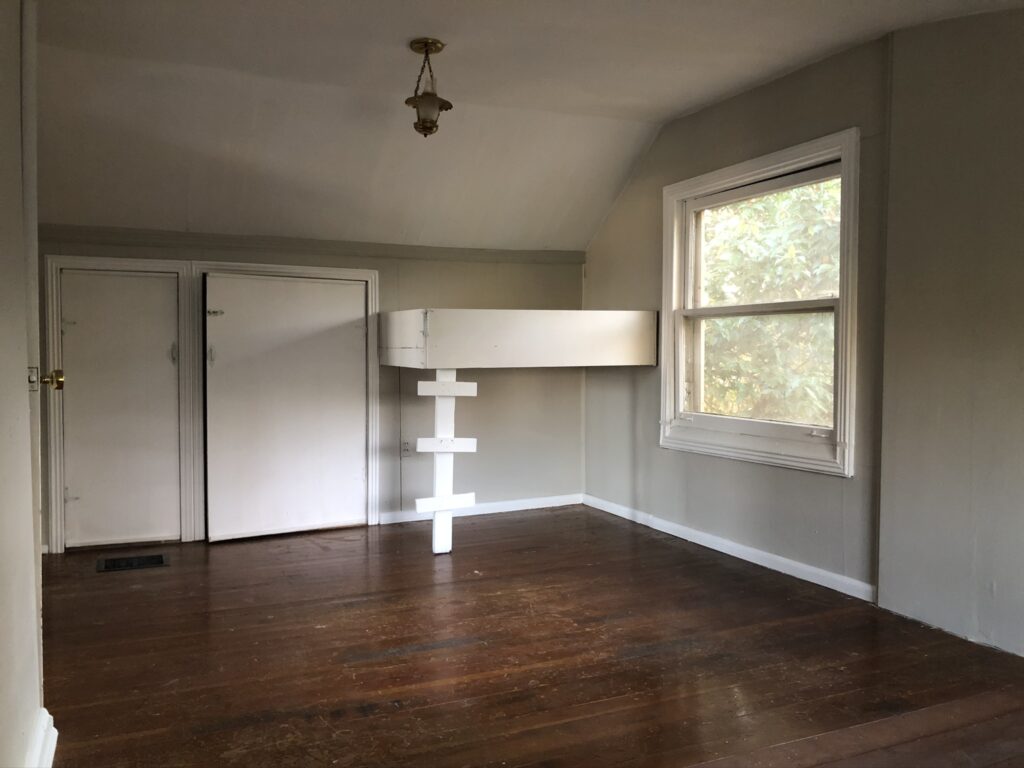
This room underwent a big change initially, and then again with this recent remodel. When we first purchased the house, this room was a tiny space, barely large enough for a bed, with a regular closet and linen closet on the left hand side of the room. There was also a linen closet cutting into this room from the hallway. We immediately took them all out out and gained about 4 feet of width and 12 feet of length. This also allowed us to move the door to a spot which made a lot more sense, and utilize the space more efficiently. It was the right move for sure, but it left us with torn up walls, big holes in the ceiling and shredded, mismatched drywall for a couple years.
AFTER
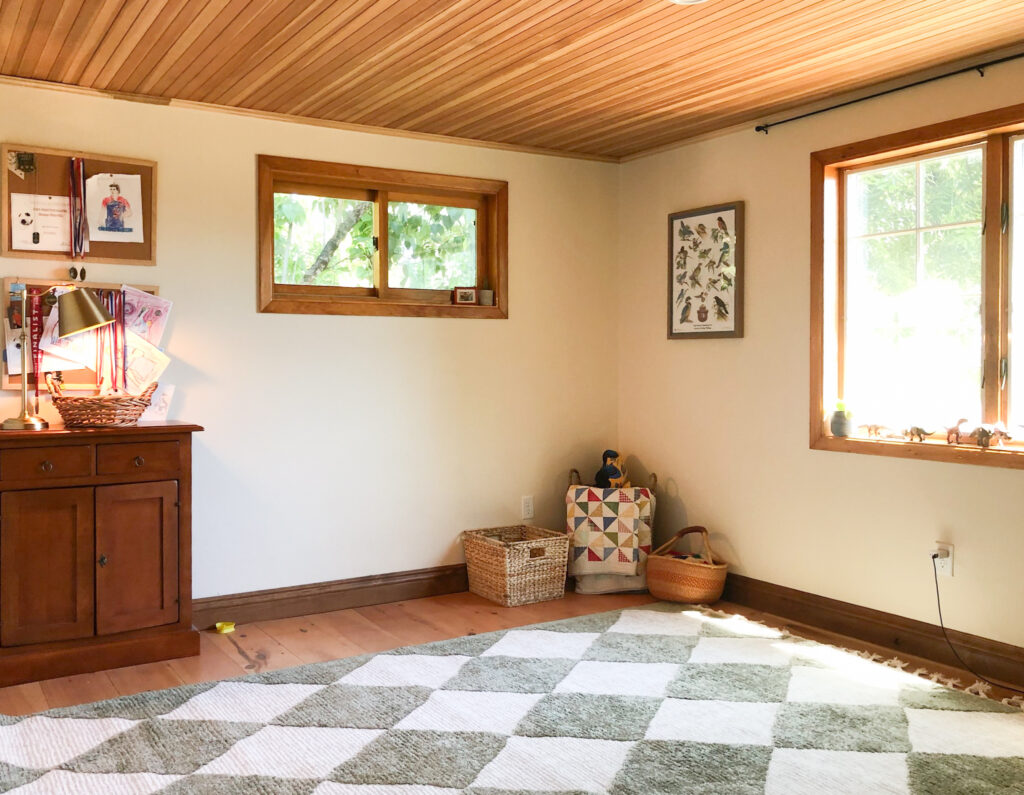
A few years ago we installed a tongue and groove fir ceiling in here, just like the living room. We had extra material and it was initially intended to be our primary bedroom. It has a low ceiling, so the wood ceiling really shines. We also finally had the walls repaired, completed the door and base trim and put a new coat of paint on the walls. Here’s a video of us adding the ceiling.
During the remodel this summer, we started to wonder what it would be like to move all of us upstairs and gain some more livable space downstairs. So we gave it a try, and WE LOVE IT! I don’t miss sleeping in this space at all and it’s a perfect playroom.
There’s still work to do in here, and someday we’d love to replace the big window with a french door leading out to a deck, but for now, it’s the PERFECT space for our boys. Three times what they had for indoor playing space before. I also love that because it’s in the back corner of our home, I no longer step on legos, worry about people coming over or have to kill myself picking up toys every single night just so I can relax. It’s been SUCH a gift to us all.
I can also see us putting a sectional in here, with a TV on the shelves someday. Seems like it could make a sweet den for the boys and their buddies as they grow up. I can see a lot of soccer games being watched in this room!
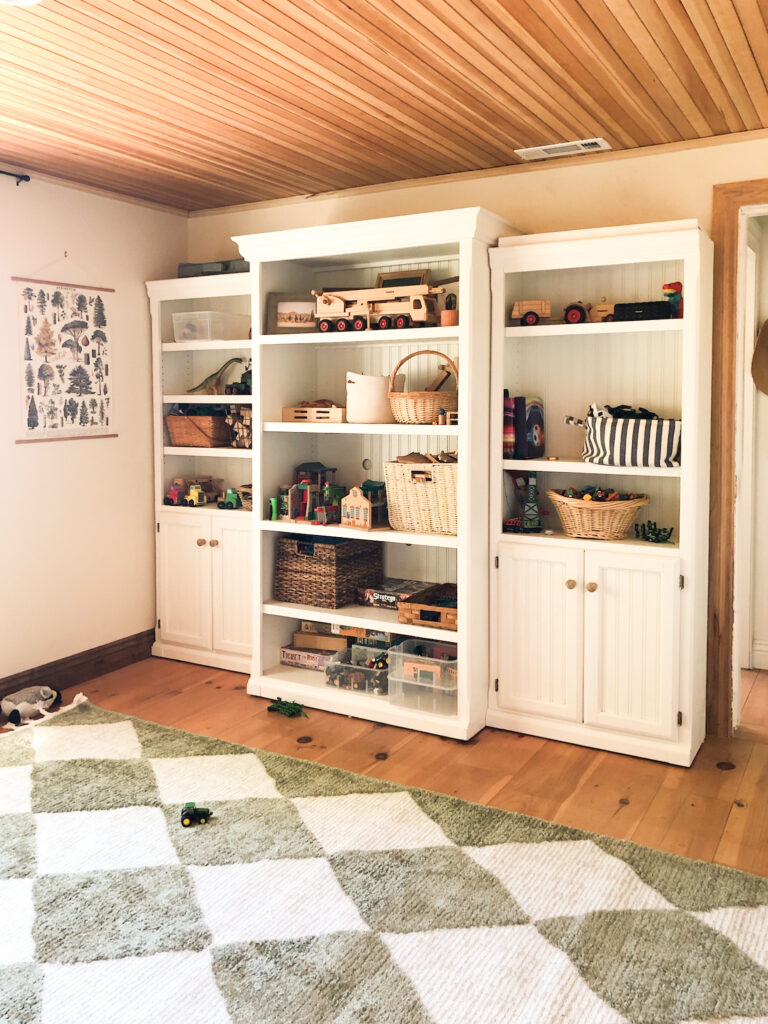
I found the shelving on Marketplace for $250. It’s solid wood (very heavy) and stores all their toys perfectly, at least when the toys aren’t all over the floor. The rug was a Target find (and the same one as our living room) and they LOVE it, mostly because it’s soft and works as agricultural fields for their toy tractors.

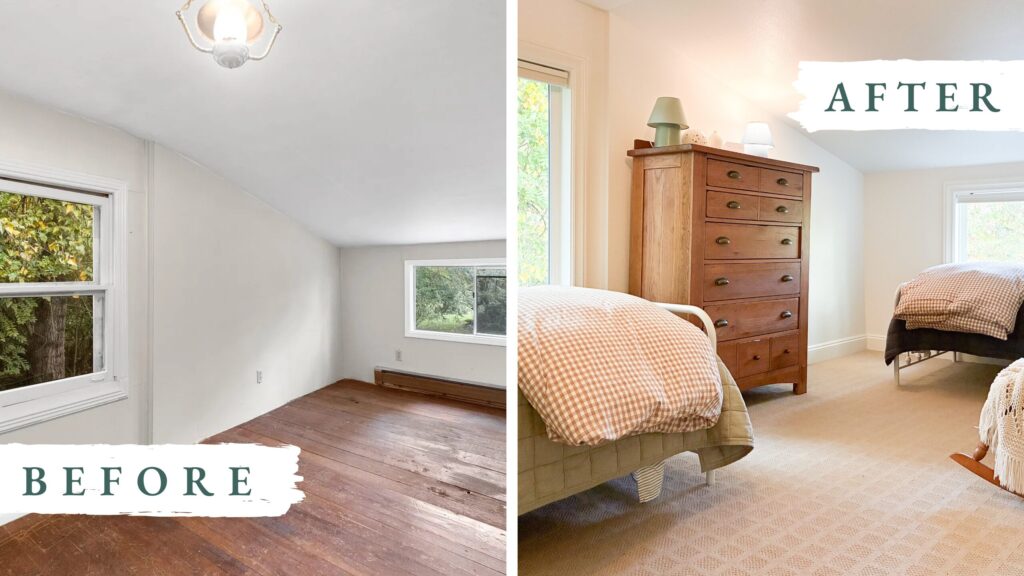
Swedish Cottage Bedroom
BEFORE
If I had to guess, I’d bet the upstairs of our home was probably never intended to be lived in. The house was originally just a box with an attic on top. In the 1990’s the previous owners added the Entry, Dining Room and Sunroom, as well as the upstairs bedrooms and bathroom. It’s a bit cobbled together and has been quite the task to fix up.
When we moved in, these upstairs rooms were in pretty rough shape. The floors had clearly had carpet glued to them at one point. There was really nasty outdoor carpet glued to the landing and narrow, steep stairs. The sellers had spray painted everything in the house with a fresh coat of greige, and the trim with white, but it wasn’t well done and full of runs. The small windows were aluminum and leaky, the large windows original and single pane. There was very little insulation and no heat.
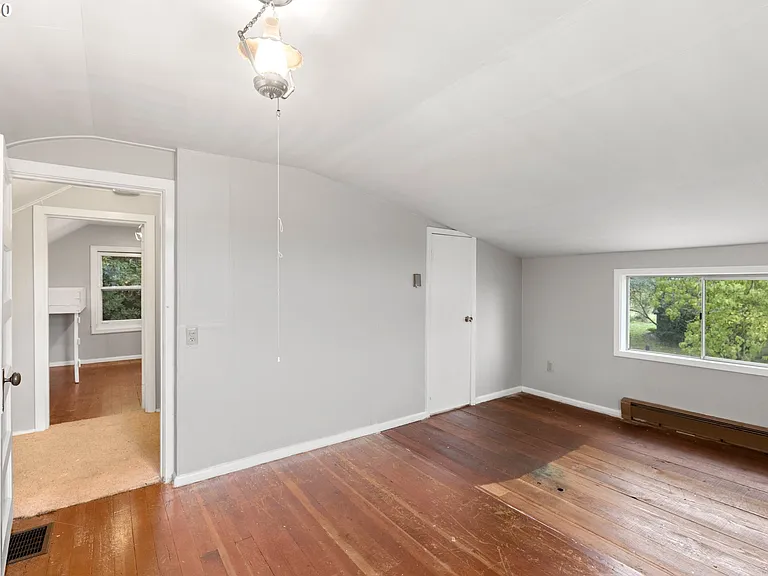
We put our boys up here, each in their own room initially, because they were still little, napping and needed their own space. But I hated even going up there, it was so cold, drafty and dirty. This room on the east side did have an incredible view though, and my husband and I often wondered about moving up here someday.
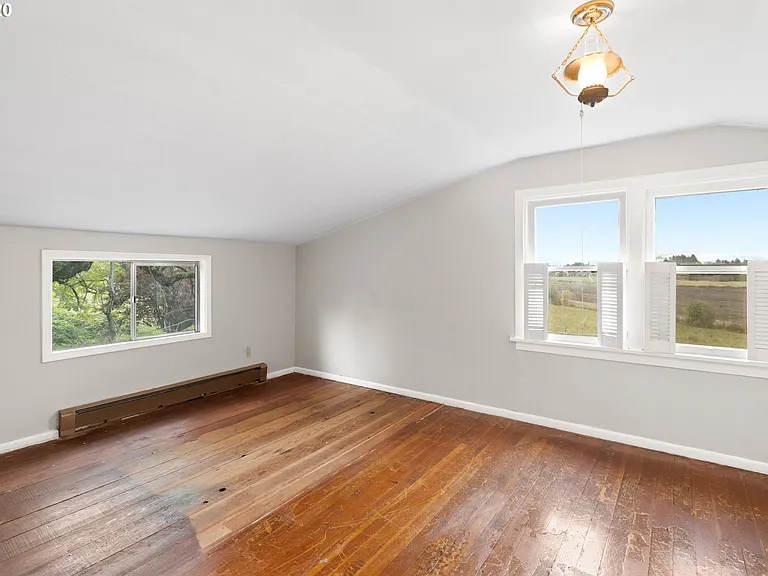
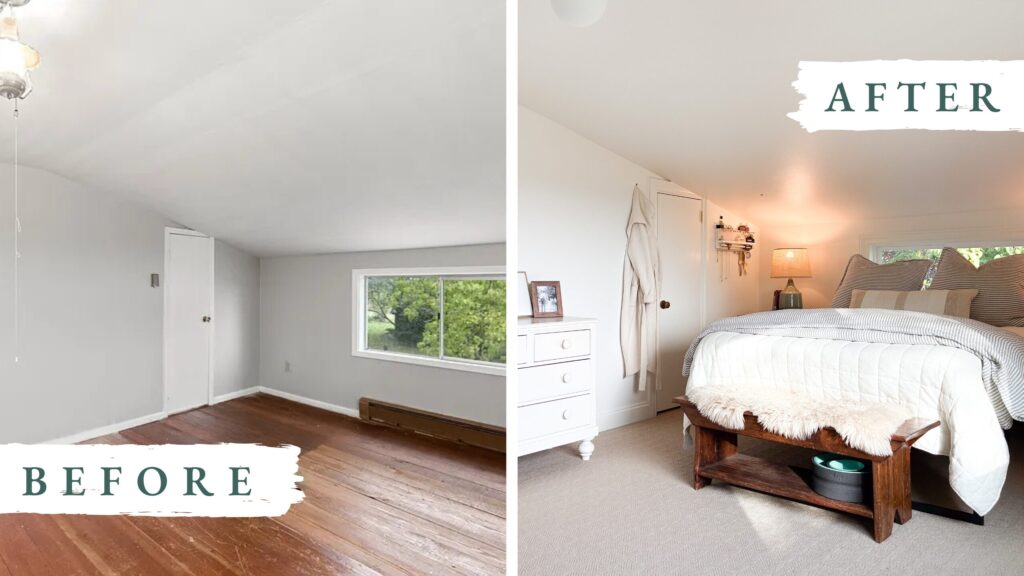
AFTER
Throughout the course of our time here, we discovered that 1. we needed a new roof and 2. there was a significant amount of mold on the plywood that sat between the shingles and our ceilings. Right above my babies. We struggled with sickness SO BAD the first few years we lived here, and once we discovered the mold, it all made so much more sense. Two summers ago we replaced the outside of the roof, knowing that when we redid the upstairs eventually we’d fix the inside of the ceiling too. And this last summer, we finally did!
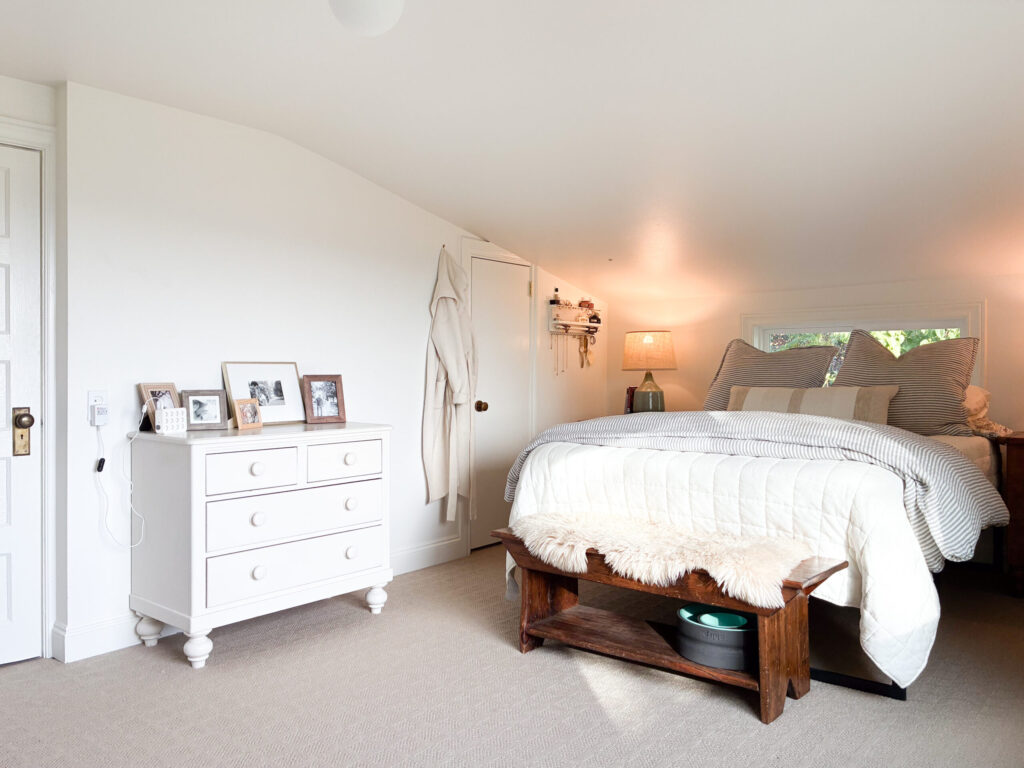
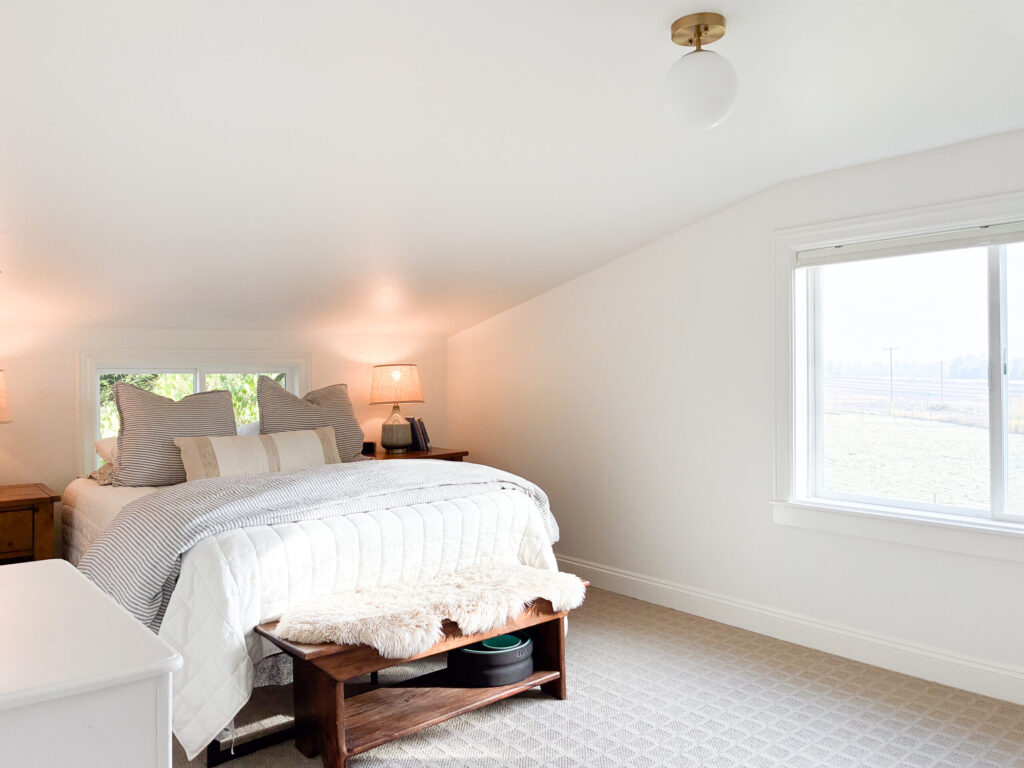
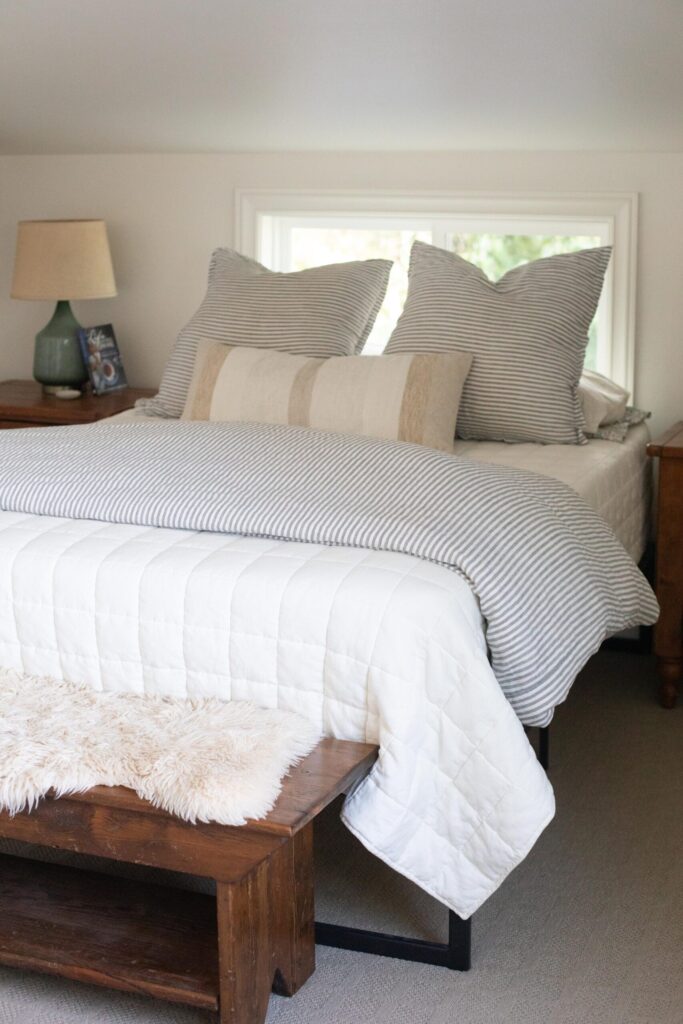
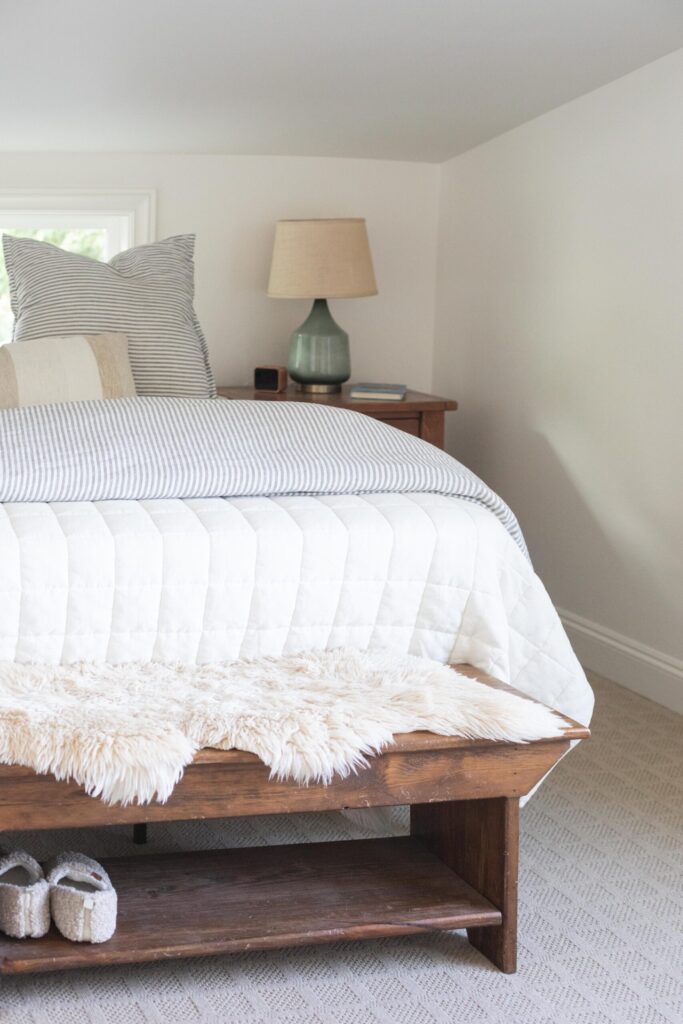
The entire upstairs got new drywall, new wool carpet, new lights, new trim and base, freshened up doors and brand new windows. It’s so light and bright and clean!
My husband and I also decided to move our room up here instead of the primary bedroom downstairs. It is so quite and peaceful up here and the morning light is hard to beat. I love waking up to soft carpet and sunlight streaming in, and it’s been such an unexpected delight.
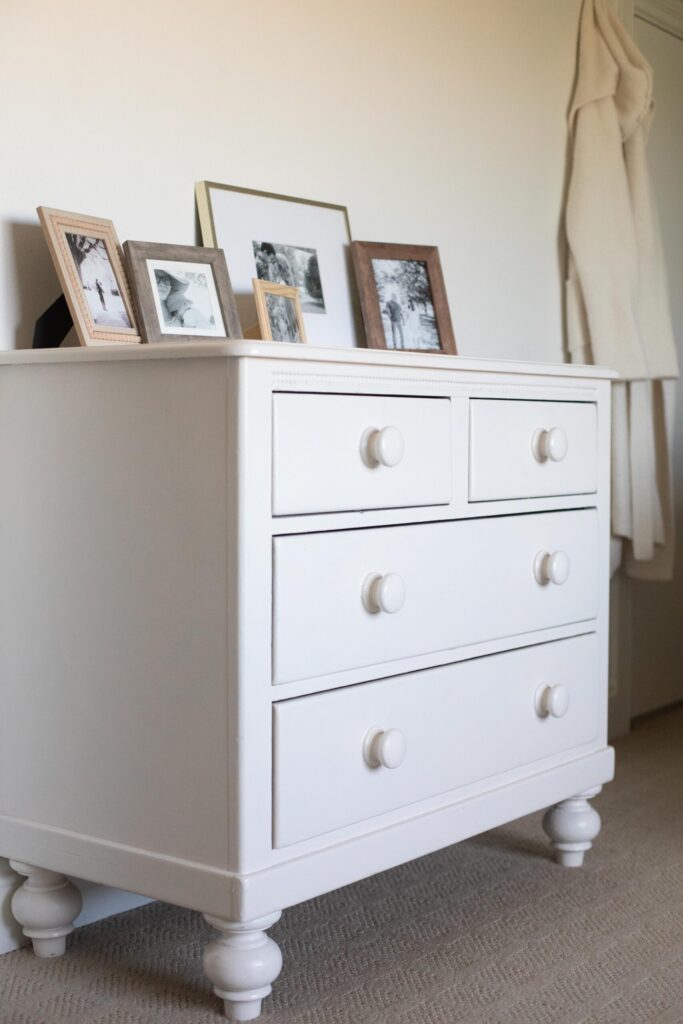
The one drawback of this space, of the whole house really, is the fact that we don’t have a single closet. So I have to store my clothes in this one small dresser and a small hanging rack in the corner, while my husband’s clothes are in a dresser in the guest room. It honestly works just fine, and doesn’t bother me at all. But I guess it’s not an ideal set up.
Swedish Cottage Kids Room
BEFORE
This room, directly across from what is now our room, is not a large space. It just fits two twin beds and a tall dresser. It’s small and cozy now, but when we moved into the house, it was a wreck. We had our youngest in here, and at the time, there wasn’t space for anything but his twin bed, dresser and a rocking chair.
The worst part was that shortly after we moved in, the ceiling began peeling and heaving down into the space. Come to find out there was a massive roof leak, causing most of the mold issues, as well as rot and the ceiling sag. This room was always freezing cold and there was a good 1/2 inch gap in the old creaky window where cold air just flowed in. Except in the Summer of course, when it was absolutely sweltering in here.
AFTER
Just like in what would become our room, this space got a full facelift. Not only was the roof fixed on the outside, but inside the space got new walls, ceilings, flooring and windows. A cute star light fixture went in, and everything got a fresh coat of paint. We bought two inexpensive metal beds off Marketplace, very carefully hauled up an oak dresser we already owned, and got the boys some fresh new bedding off Poshmark.
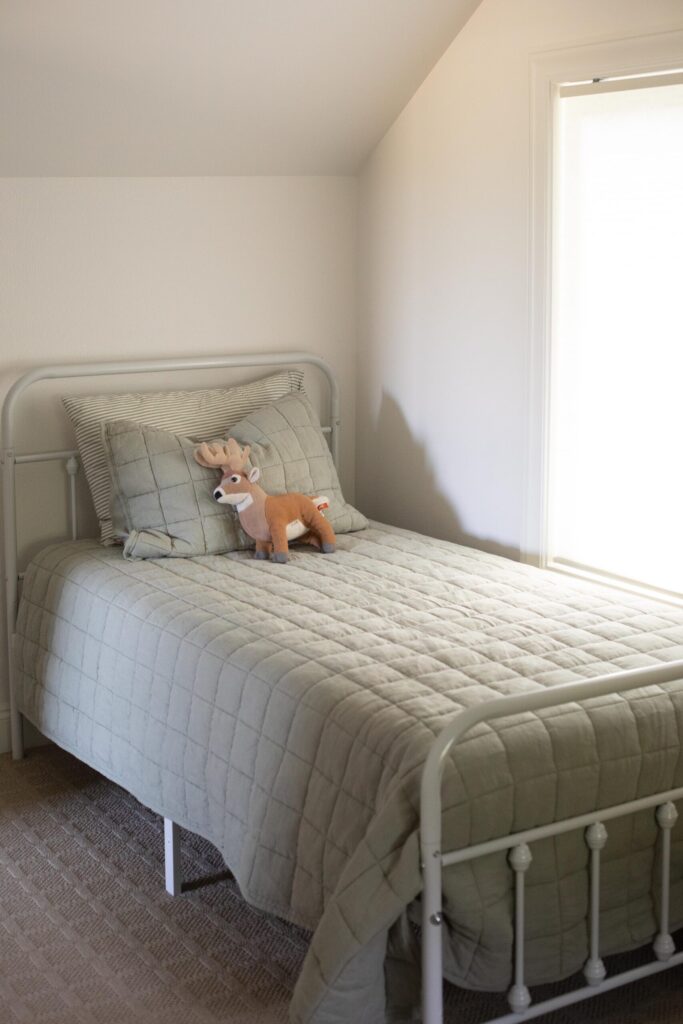

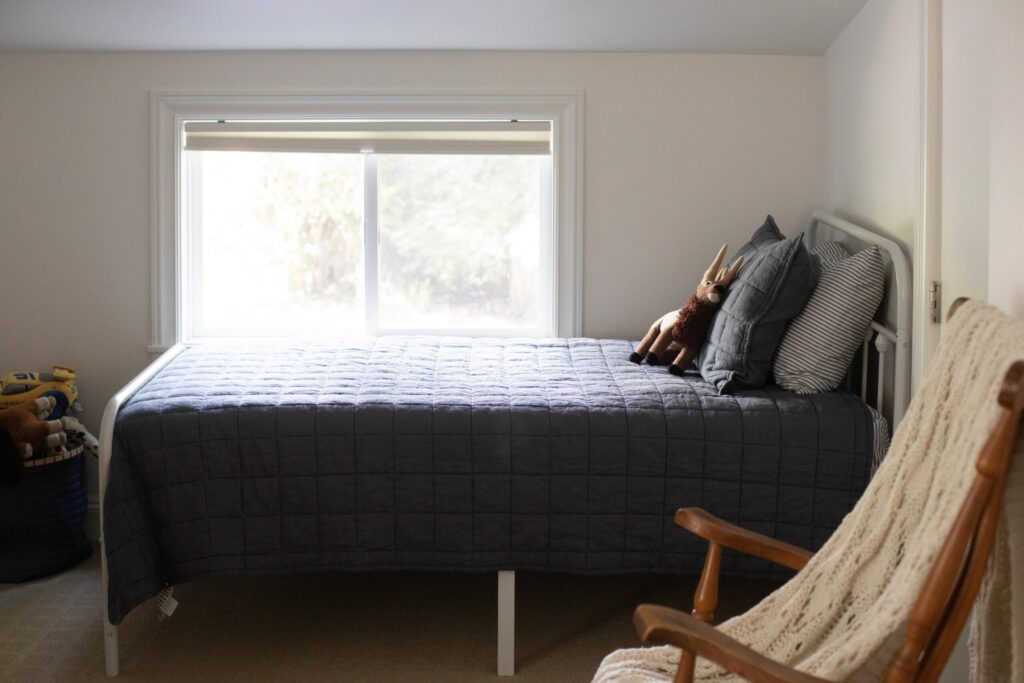
I still have some vintage Soccer art I need to hang, which isn’t exactly Swedish Cottage, but I want their room to be fun. We also still have the rocking chair in here, where their Dad sits every night as he reads to us all before bed. They LOVE sharing a room, enjoy the nights when they earn “talking time,” and spend most it telling each other wild tales of the adventures of their stuffed animals.
Swedish Cottage Attic Bathroom
BEFORE
It feels a little silly posting a BEFORE of this space since we bolted the door shut the day we moved in. The sink leaked, the toilet leaked and the odd, DIY shower shoved into an impossibly small corner, leaked. There was a nasty old vanity that looked like it had been made out of old shutters, in fact there were shutters on a variety of different surfaces, the floor was rotten and heaving and the toilet rattled around on an unsteady base. Delightful, huh?
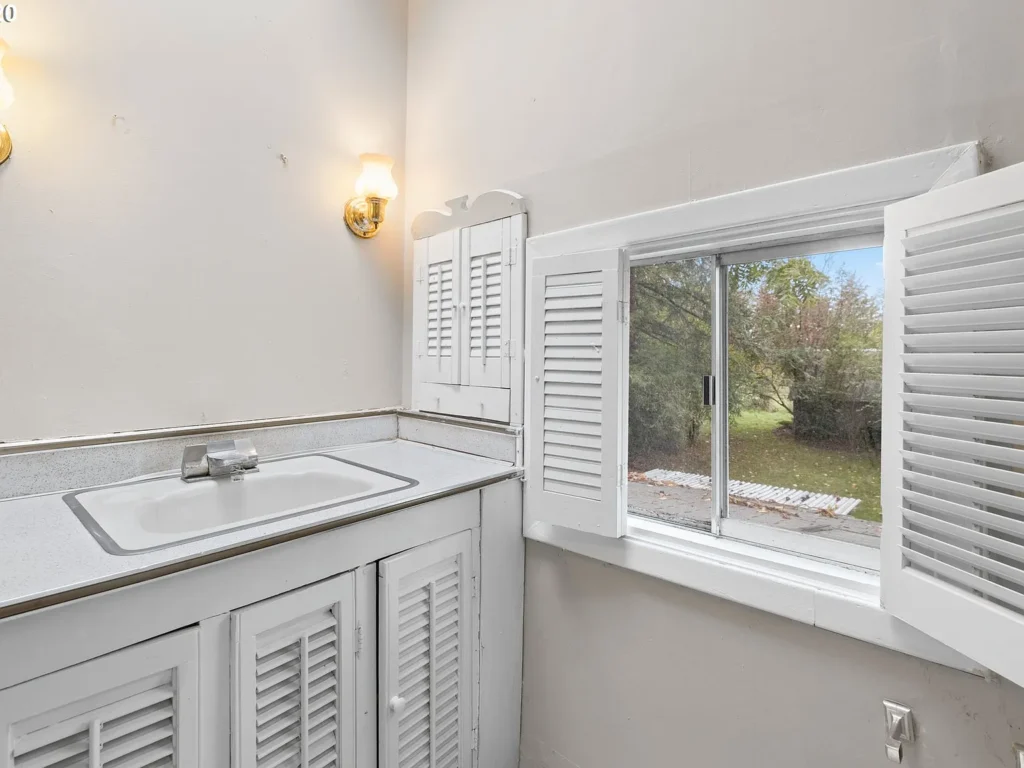
I thought we should take it out all together, after all, we’d lived with one bathroom for almost 5 years, but it was more expensive to remove the plumbing than to fix it, so we went ahead and fixed it up this summer.
AFTER
And boy am I ever glad we did. Having two bathrooms, especially two brand new, beautiful, CLEAN bathrooms, is SUCH a luxury. SUCH a luxury. Two people can shower at the same time, brush their teeth at the same time, and NEVER AGAIN will I have to deal with someone sitting on the pot while I curl my hair. HALLELUJAH!
I also love how light, bright and verrrrry Swedish Cottage this room feels. Just like the one downstairs, this bathroom looks straight out of my inspiration picture. I’m thrilled!
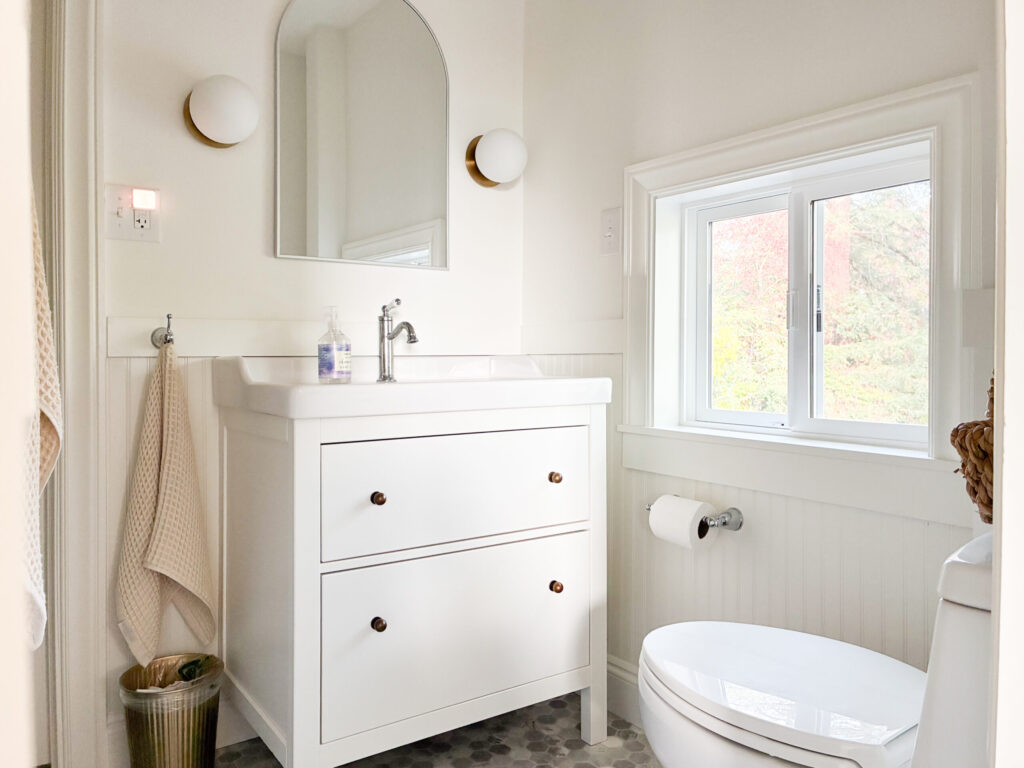
My Dad laughed at me in the selection process, but from day one I knew I wanted sheet vinyl in this room. Not tile, not LVT, not anything with a seam or grout or line. I wanted an IMPENETRABLE surface, easy to wipe and impossible for boy pee to work its way into. And this sheet vinyl we went with has fit the bill perfectly. It actually looks like real tile too, and everybody who sees it thinks it is. We used the same IKEA sink and vanity up here, installed a new toilet, and my Dad and I fixed every surface in this tiny room so that we could gain an extra 6 inches for the shower.
I may owe my Dad for life for all the blood, sweat and swear words he put into this space. THANK YOU DAD! You’ve saved me from a life of bathroom invasions! Having a bathroom right next to my bedroom isn’t half bad either. Those middle of the night pit stops are much more comfortable these days.
What do you think 5 years in?
Whew! That was A LOT. What do we think!? How do we feel about the progress on our little Swedish Cottage after 5 years here at Bramblewood? I have to say, I’m pretty tickled myself. This little old house finally feels like home.
If you have any questions about sources for anything, just leave a comment below. I’d be happy to answer any remodel questions as well! Us old house folks gotta stick together. What do you think about this thing I’m calling Swedish Cottage style? Pin this image below to save all these BEFORE & AFTERS.
Thanks for coming along on this crazy ride, friends. Though I have a feeling, the best is yet to come! Cheers!